
Quercus (Canvas) Groups allows instructors to organize students into smaller groups for collaborative activities, discussions, projects, and assessments. Instructors can create groups manually, assign students automatically, allow students to choose their groups, or import group memberships using a CSV file.
Each group also has a separate workspace where students can communicate, share files, and collaborate. Instructors can choose whether to incorporate these workspaces into their teaching activities or use Groups primarily to organize students for assignments and discussions.
The University of Toronto also provides the UT Advanced Group Tool, which offers additional options for creating and managing groups, organizing enrolments, and creating sections.
Designing Group Activities for Learning
Groups can support collaborative learning by providing opportunities for students to exchange perspectives, develop ideas, solve problems, and work towards shared learning goals. Before creating groups in Quercus, consider how group activities will contribute to your course learning outcomes and how students will participate.
Planning Collaborative Activities
When designing group activities, consider:
- Purpose and expectations: Explain why students are working in groups, what they are expected to accomplish, and how their contributions will be assessed.
- Group composition: Determine whether students should be assigned randomly, organized according to particular criteria, or allowed to choose their group members.
- Group size: Select a size appropriate to the activity, recognizing that smaller groups may support more opportunities for individual participation.
- Roles and responsibilities: Consider assigning roles or inviting students to establish shared expectations for communication, decision-making, individual contributions, and completing tasks.
- Scaffolding and feedback: Provide opportunities for students to plan, check their progress, receive feedback, and reflect on their collaboration.
- Accessibility and inclusion: Consider students’ schedules, access to technology, communication preferences, and participation needs. Provide clear instructions and flexibility where appropriate.
For longer projects, consider combining group deliverables with opportunities for individual reflection or assessment. This can help instructors recognize individual learning while supporting collaborative work.
Understanding Groups and Sections
Although Groups and Sections both organize students into smaller subsets of a course, they serve different purposes in Quercus.
| Groups | Sections |
|---|---|
| Primarily support collaborative learning and group activities | Primarily support course administration and enrolment organization |
| Created and managed by instructors | Typically established through U of T enrolment processes |
| Provide separate student group workspaces | Do not provide comparable collaborative workspaces |
| Support group assignments, discussions, and projects | Support section-specific activities, differentiated deadlines, and grading workflows |
| Can be organized independently of course sections | Can reflect lecture, tutorial, or practical enrolments |
Groups and Sections can also be used together. For example, instructors might organize students into project groups within their tutorial sections or use the UT Advanced Group Tool to create sections based on existing groups.
For more information, visit Arts & Science’s Groups vs. Sections resource.
Creating and Organizing Groups
Instructors manage groups through People in Course Navigation. Groups are organized within Group Sets, which contain the individual groups created for a particular purpose, such as a project or discussion activity.
A course can have multiple group sets. For example, instructors might create one group set for semester-long projects and another for shorter collaborative activities.
Creating Group Sets
To create a group set:
- Select People from Course Navigation, then open the Groups tab.
- Select + Group Set.
- Enter a descriptive name for the group set.
- Choose how students will be organized:
- Create groups later: Create groups and assign students manually or import memberships.
- Split students by number of groups: Automatically distribute students across a specified number of groups.
- Split number of students per group: Automatically create groups based on the desired number of students per group.
- Configure any additional options, such as self sign-up or group leadership.
- Select Save.
Canvas can automatically create up to 200 groups within a group set. Groups require at least two members. Group names should be meaningful to instructors and students, particularly when a course uses multiple group sets.
For detailed instructions, visit Canvas’s How do I add a group set in a course?.
Assigning Students to Groups
Instructors can assign students to groups using several approaches:
- Automatically: Distribute students across groups based on the specified number of groups or students per group.
- Manually: Create individual groups and add students through the People page.
- Through self sign-up: Allow students to select from available groups.
- Using CSV import: Upload group memberships from a prepared roster.
When creating groups manually, select the appropriate Group Set in People, choose + Group, enter a group name, and optionally specify a membership limit. Students can then be assigned by dragging their names into groups or using the available group management controls.
Instructors can also assign student group leaders. Leaders can manage membership and edit group names. Group leaders can be assigned automatically during group set creation or designated manually after groups are created. Consider whether students need these responsibilities before enabling the option.
Important: Canvas offers an option to Require group members to be in the same section. When students are enrolled in multiple sections, such as a lecture and tutorial, this setting may cause issues. Review your course enrolment structure before enabling it. UTM’s Quercus Groups resource discusses this consideration.
Supporting Self Sign-Up
Self sign-up allows students to select the group they want to join within an instructor-created Group Set. Instructors can establish group membership limits and, where appropriate, restrict groups by section.
To enable self sign-up, select Allow self sign-up when creating or editing a Group Set. Students then select from groups that have already been created.
Students access available groups through People in Course Navigation. Instructors must make People visible to students for this feature to work.
Keep in mind that:
- Enabling People also allows students to view the names of other students enrolled in the course.
- Students may switch between available groups while self sign-up remains enabled, subject to any membership limits or section restrictions.
- Instructors should finalize group membership before students begin submitting graded group work.
- Self sign-up can be disabled once group membership is finalized.
Self sign-up groups can be used for graded group assignments and discussions. However, students must be assigned to the groups before the group set can be used for these activities. This differs from student-created groups, which cannot be used for graded group assignments.
For detailed instructions, visit Canvas’s How do I create self sign-up groups in a group set?.
Importing Groups Using CSV Files
Canvas includes an Import Groups feature for creating and assigning groups using a CSV file. This can be particularly useful in large courses or when group memberships have already been determined.
To import groups:
- Create a Group Set using Create groups later.
- Open the Group Set and select + Import.
- Download the Course Roster CSV template.
- Enter the appropriate group names in the
group_namecolumn. - Save the file as a CSV.
- Upload the completed file through Import Groups.
- Review the Group Set to confirm that students have been assigned correctly.
The downloaded roster includes section information, which may be useful when organizing students according to tutorial or practical enrolments. Group names entered in the CSV can be used to create new groups or assign students to existing groups.
For detailed instructions, visit Canvas’s How do I import groups in a group set?.
The UT Advanced Group Tool provides another method for importing group rosters, particularly when instructors need additional institutional enrolment information or administrative functionality. These options are discussed later in this resource.
Faculty of Applied Science & Engineering’s How do I assign a large number of students to Groups in Quercus? compares both approaches.
Supporting Group Collaboration
Once students are assigned to groups, they can participate in collaborative activities using Quercus. Groups can support assignments and discussions without requiring students to use every feature of their separate group workspace.
Exploring Group Workspaces
Each group has its own workspace, accessible to group members and authorized course staff. Depending on the available tools, students can:
- Create and review group announcements.
- Develop and share group pages.
- Participate in group discussions.
- Upload and access group files.
- Review group membership.
- Use group calendars and supported collaboration tools.
Instructors and TAs can access group workspaces to review group activity, provide guidance, and support students as they collaborate.
To access a group workspace, open People, select the appropriate Group Set, and choose Visit Group Homepage from the group’s options menu.
Group files and storage: Canvas provides a default storage quota of 50 MB per group. Students can review their group’s available storage through Files in the group workspace. Group members can upload, manage, and delete shared files, so instructors should clarify expectations for managing collaborative materials.
Group calendars: Students can create events within their group calendar. These events are visible to other group members and may be confused with official course dates. Instructors should establish where students can find authoritative deadlines and schedule changes.
Helping Students Navigate Group Workspaces
Students may be unfamiliar with the separate workspace created when they join a group. Its navigation resembles the main course, which can make it difficult to distinguish between course-wide and group-specific activities.
Before students begin group work, consider:
- Explaining how students can locate their group through Groups in Global Navigation.
- Clarifying the difference between the main course and the group workspace.
- Identifying which tools students are expected to use for collaboration.
- Explaining where assignments and discussions are accessed and submitted.
- Providing instructions for returning to the main course.
- Sharing student-facing guidance on navigating groups.
Using the group workspace is optional. Instructors can use Groups to organize students for assignments or discussions while recommending that students collaborate through other agreed-upon methods. The important consideration is that students understand the purpose of the group, the tools they should use, and where they are expected to complete their work.
Instructors can share these Canvas Student Guides:
Note: Canvas Student View does not accurately reproduce the experience of a student assigned to a group. Instructors should not rely on the Test Student to evaluate group membership or workspace access.
Supporting Group Assignments and Discussions
Once groups are created, instructors can connect a Group Set to assignments or discussions.
Group assignments allow students to submit work collaboratively. Typically, one group member submits on behalf of the group, and the submission is associated with the other group members.
Instructors can assign a shared grade or configure individual grading. They can also assign an assignment to specific groups and establish different due dates or availability dates for those groups.
To create a group assignment:
- Open Assignments and create or edit an assignment.
- Select This is a Group Assignment.
- Choose whether to Assign Grades to Each Student Individually.
- Select the appropriate Group Set.
- Configure the submission requirements, due dates, and availability dates.
- Select Save or Save & Publish.
Important considerations:
- Students should be assigned to groups before a group assignment is published.
- Instructor-created self sign-up groups can be used for group assignments once students have joined or been assigned to the groups.
- Student-created groups cannot be used for graded group assignments.
- Group assignments cannot use the External Tool submission type.
- Changes to group membership after submission can affect grades, submissions, and feedback.
For more information, visit Quercus (Canvas) Assignments, Quercus (Canvas) SpeedGrader, and Canvas’s How do I assign an assignment to a course group?.
Group discussions allow instructors to create one discussion topic that is presented separately to each group. Students participate in their group’s discussion rather than a course-wide conversation.
Graded group discussions assess individual student participation rather than assigning one shared grade to the group.
Instructors can also assign graded discussions to particular groups and establish different due dates or availability dates.
For more information, visit Quercus (Canvas) Discussions and Canvas’s How do I assign a graded discussion to a course group?.
Supporting Student-Created Groups
Canvas can also allow students to create their own informal groups for studying, collaboration, or shared interests.
Student-created groups differ from instructor-created Group Sets:
- Students can create and organize their own groups when the feature is enabled.
- Students can belong to more than one student-created group.
- Student-created groups can support informal collaboration, discussions, and study activities.
- Student-created groups cannot be used for graded group assignments.
To manage this functionality, instructors can visit Settings > Course Details and review the Let students organize their own groups option. Student-created groups appear under the Student Groups tab in People.
For more information, visit Canvas’s How do I allow students to create their own student groups?.
Managing Groups and Membership
Group membership may need to change during a course because of enrolment changes, student requests, group conflicts, or adjustments to learning activities.
Instructors should review the implications of changing group membership, particularly when students have already submitted assignments or participated in group discussions.
Reviewing and Updating Group Membership
Instructors can review group membership through People by selecting the relevant Group Set.
Depending on the group’s configuration, instructors can:
- Add students who have not yet been assigned.
- Move students between groups.
- Edit group names and membership limits.
- Assign or change group leaders.
- Review students who remain unassigned.
- Edit, clone, or delete group sets.
To move a student, expand the relevant group and drag the student’s name to another group, or use the student’s options menu and select Move To.
Group memberships should be reviewed after significant enrolment changes, particularly near the beginning of a term.
For detailed instructions, visit Canvas’s How do I move a student into a different group?.
Managing Changes After Submissions
Changing group membership after students have submitted assignments can affect existing submissions, grades, annotations, and comments.
When group membership must change, instructors generally have two options:
- Create a new Group Set: Clone the existing Group Set and adjust membership in the new version. The original Group Set remains associated with earlier assignments and discussions, while the new Group Set can be used for future activities. This is generally the safer approach when group membership changes after submissions. The Group Set associated with an assignment cannot be changed once students have submitted work.
- Change an existing Group Set: Modify membership directly. This may be appropriate before group work begins, but requires greater caution once submissions or grading have occurred.
Before making changes, instructors should:
- Review completed group assignments and existing feedback.
- Confirm that grades have been recorded appropriately.
- Determine whether future assignments and discussions should use a new Group Set.
- Review the implications for students who have already submitted work.
- Verify group membership and assignment settings after making changes.
If changes to an existing group set are necessary after grading, instructors may need to use Assign Grades to Each Student Individually to preserve or adjust individual scores. This should be reviewed carefully before changing memberships.
Deleting groups or group sets: Deleting a Group Set also deletes the groups within it. Canvas documents that deleting a Group Set associated with graded assignments can change how submissions appear in SpeedGrader, even when previously assigned grades and comments remain available. Avoid deleting group sets associated with student work unless necessary.
For detailed guidance, visit Faculty of Applied Science & Engineering’s How do I make changes to group membership during the course? and Canvas’s How do I edit or delete a group set in a course?.
Accessing and Monitoring Group Activity
Instructors and TAs can visit group homepages to review discussions, announcements, shared materials, and other activity within group workspaces.
This can help instructors identify where students may need additional guidance, clarify expectations, or address challenges with collaboration.
However, activity within Quercus does not necessarily represent all the work students undertake. Groups may collaborate through meetings, shared documents, or other communication channels. Instructors should interpret group activity alongside other evidence of student learning and participation.
Using the UT Advanced Group Tool
The UT Advanced Group Tool (UTAGT) provides additional functionality for managing groups and sections in Quercus. It is particularly useful for large courses, complex enrolment structures, and administrative workflows that extend beyond Canvas’s built-in Groups functionality.
The tool supports:
- Creating baseline group sets from course or section enrolments.
- Updating baseline group memberships.
- Removing members from multiple groups.
- Creating sections based on existing groups.
- Updating or deleting sections created from groups.
- Importing group rosters.
- Exporting group and course rosters.
To access the tool, select Settings > Navigation, enable UT Advanced Group Tool, and save your changes. Access is restricted to authorized course staff roles, including Teacher, TA, Course Staff, Grader, Designer, and Librarian.
Creating Baseline Group Sets
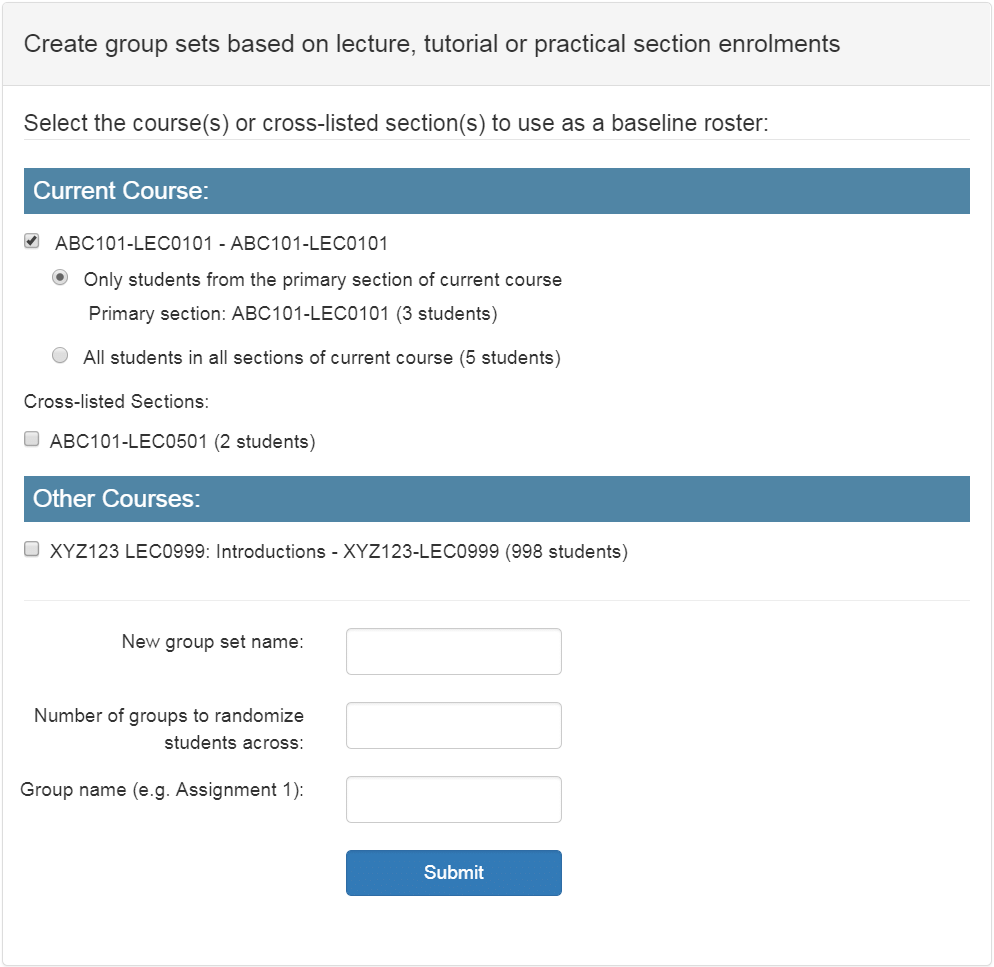
Baseline Group Sets use enrolment information from an existing course or section to create groups.
This can help instructors organize students according to tutorial, practical, or other enrolment structures.
- Open UT Advanced Group Tool.
- Select Create Baseline Group Set.
- Choose the course or section roster to use:
- Current Course: Select students from the primary section or all sections of the current course.
- Cross-listed Sections: Select sections that have been cross-listed into the current course.
- Other Courses: Select another course in which you have an appropriate course staff role.
- Enter a name for the Group Set.
- Specify how many groups to randomly distribute students across. To organize students manually afterward, enter 1, then create additional groups and assign students manually.
- Provide a name for the groups.
- Select Submit.
Only students enrolled in the current Quercus course can be added to its Group Set. Baseline Group Set memberships do not update automatically when course or section enrolments change. Refer to Updating Baseline Group Sets for instructions.
Important distinction: Arts & Science notes that the UT Advanced Group Tool cannot directly create one Group Set containing separate groups that each automatically correspond to different tutorial or practical section rosters. Selecting multiple sections combines their students into the baseline roster rather than automatically creating one group per section.
Instructors who need a single Group Set containing tutorial-specific groups can instead prepare and import a CSV using Canvas’s built-in Import Groups feature.
For more information, visit Arts & Science’s Creating Student Groups resource.
Updating Baseline Group Sets
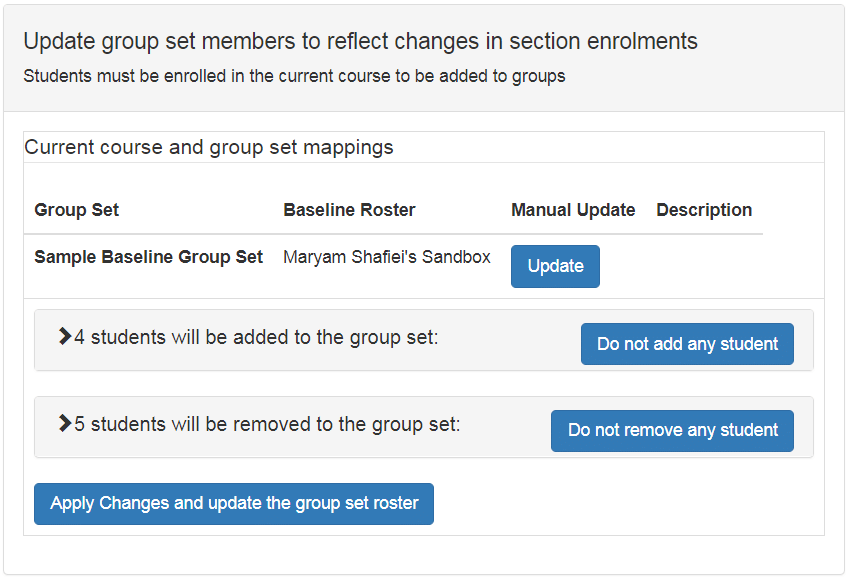
Baseline group memberships do not automatically update when students join a course or change sections. Instructors need to synchronize them manually.
To update a baseline group set:
- Open UT Advanced Group Tool.
- Select Update Baseline Group Sets.
- Locate the relevant Group Set and select View Enrollment Changes.
- Review the proposed additions and removals.
- Exclude any changes that should not be applied.
- Select Update Group Set Membership.
Students who drop the course are removed through the regular Quercus enrolment process, but students who join or change sections may require a manual baseline update.
The UT Advanced Group Tool also includes Remove All Group Members, which can clear membership from selected groups within a Group Set.
- Select Remove All Group Members.
- Choose the relevant Group Set.
- Select the groups whose members should be removed.
- Select Remove.
Use this function carefully, particularly if the groups have already been used for graded assignments or discussions.
Creating Sections from Groups
The UT Advanced Group Tool can create course sections that mirror existing group memberships. These are called cloned sections.
This can be useful when instructors need section-based administrative functionality for groups, such as:
- Filtering students in the Gradebook or SpeedGrader.
- Organizing TA grading responsibilities.
- Managing differentiated assignments or deadlines through sections.
To create cloned sections:
- Open UT Advanced Group Tool.
- Select Clone Groups into Sections.
- Choose the relevant Group Set.
- Select the groups to be converted into sections.
- Select Clone.
The tool creates a separate section for each selected group.
Updating or Deleting Cloned Sections
Cloned sections are separate from the original groups. Changes to group membership do not automatically update the corresponding section enrolments, so instructors must synchronize cloned sections when group memberships change.
To maintain cloned sections:
- Open UT Advanced Group Tool.
- Select Clone Groups into Sections.
- Choose the relevant Group Set.
- Locate the cloned sections.
- Select Synchronize to update section membership or Remove Section to delete a cloned section.
For detailed guidance, visit Arts & Science’s Creating Group Sets and Sections with the UT Advanced Group Tool.

Importing Group Rosters
The UT Advanced Group Tool supports bulk group management using CSV or Excel files. This can be particularly useful when working with large enrolments or predetermined group memberships.
Instructors can import students into:
- A single existing group: Add students to a group that has already been created.
- A single new group: Create a new group and populate it.
- Multiple existing groups: Assign students to several groups that already exist.
- Multiple new groups: Create and populate multiple groups through one import.
To import a roster:
- Open UT Advanced Group Tool.
- Select Import Group Roster.
- Choose the Group Set.
- Select the appropriate import method.
- Prepare and upload the file according to the required format.
- Single existing group: single column of student UTORids
- Single new group: single column of student UTORids
- Multiple existing groups: first column of student UTORids and second column of Group IDs
- Multiple new groups: first column of student UTORids and second column of Group Names
- Select Import and verify the group memberships.
Students must already be enrolled in the current Quercus course and must not already belong to another group within the target Group Set.
Canvas Import Groups and the UT Advanced Group Tool support different workflows:
- Canvas Import Groups: Useful when instructors need section information from the course roster or want to create groups based on a prepared CSV.
- UT Advanced Group Tool: Useful when instructors need institutional identifiers, more flexible bulk import methods, baseline group sets, or administrative functions involving sections.
For detailed instructions and a comparison of both methods, visit Faculty of Applied Science & Engineering’s How do I assign a large number of students to Groups in Quercus?.
Exporting Group Rosters
Instructors can export selected group memberships or a course roster for administrative purposes.
To export a group roster:
- Open UT Advanced Group Tool.
- Select Export Group Roster.
- Choose the Group Set and groups to include.
- Select Generate group roster report.
- Open Quercus Inbox to download the resulting CSV file.
The group roster report may contain student names, student numbers, UTORids, group names and IDs, and email addresses.
The tool also provides an option to generate a course roster report without group membership information.
Exported rosters contain personal student information. Store, share, and dispose of these files securely.