Quercus access is now being gradually restored across the University. During this transition period, some features or workflows may remain temporarily unavailable as systems stabilize. Instructors are encouraged to monitor U of T’s System Status Page and UTogether for updates on Quercus availability and functionality.
Quercus Functions and Alternative Tools
The sections below organize alternative tools and workflows according to common Quercus functions and menu items. These suggestions are intended to support short-term course continuity.
Home Page / Modules / Files
OneDrive Course Folder
OneDrive folders can serve as a temporary course hub for organizing and distributing syllabi, readings, slide decks, assignment instructions, and other course materials.
Subfolders organized by week or topic can function similarly to Quercus modules.
A typical course folder might include:
- A “Start Here” Word document
- A syllabus or course overview
- Weekly learning materials
- Readings and slide decks
- Meeting links
- Assignment instructions
- Links to videos and external resources
Create and Share a OneDrive Course Folder
- Access OneDrive through Outlook on the web or Microsoft 365.
- Create a folder for your course materials (e.g., ABC 123 Spring 2026)
- Upload or create files directly within the folder.
- Select Share to create a shareable link for students.
- Set sharing permissions to People at University of Toronto and Can view so students can access materials without editing them.
- Share the folder link with students through email or a course overview document.
- You may also share the folder with collaborators such as teaching assistants and provide editing access where appropriate.
Watch a 3-minute video walkthrough demonstrating how to create and share a course folder in OneDrive.
Organize Course Materials in OneDrive
- Organize materials into clearly labelled weekly or topical folders.
- Use consistent file naming conventions so students can easily identify readings, slides, assignments, and meeting links.
- Include schedules, overview documents, or important links in central locations that are easy for students to find.
- Continue updating materials within the same shared folder structure so students can use a single access point.
Microsoft Word Documents
Microsoft Word documents can function as lightweight course home pages or weekly overview pages. Instructors may use headings, hyperlinks, schedules, embedded instructions, and links to readings or videos to help students navigate course materials outside of Quercus.
Create a “Start Here” Document
- Create a Word document at the top of your course folder, named something like “Start Here” or “Course Overview.”
- Use headings to organize sections (e.g., welcome, schedule, weekly topics, contact information).
- Add hyperlinks to weekly subfolders, readings, Zoom meetings, Forms, and external resources.
- Update the document as the course progresses and notify students when key changes are made.
Announcements
Two options can be used to communicate with your class: Outlook email and Piazza. You will likely need to send an initial email through Outlook regardless, to direct students to your course hub and (if applicable) your Piazza space.
Outlook Email
Outlook email works well for sending updates, reminders, meeting links, and short-term course instructions. You can use either the Outlook desktop application or Outlook on the web.
If needed, your departmental or divisional registrar can provide a class list with enrolled students’ U of T email addresses.
A first email to students might include:
- Where course materials will be located
- How course communication will work
- Where students should go for updates or questions
- Any immediate next steps or preparation for upcoming classes
- How to join Piazza, if applicable (refer to next section)
Send Class Email Through Outlook
- Always add the course code to the subject line of all messages.
- Add all students to the same message using Bcc field to protect student privacy.
- Separate student email addresses using semicolon (;).
- Outlook supports up to 10,000 messages per day, with a maximum of 400 recipients per message. If your class exceeds 400, divide your class list into smaller batches.
Use the Bcc Field in Outlook
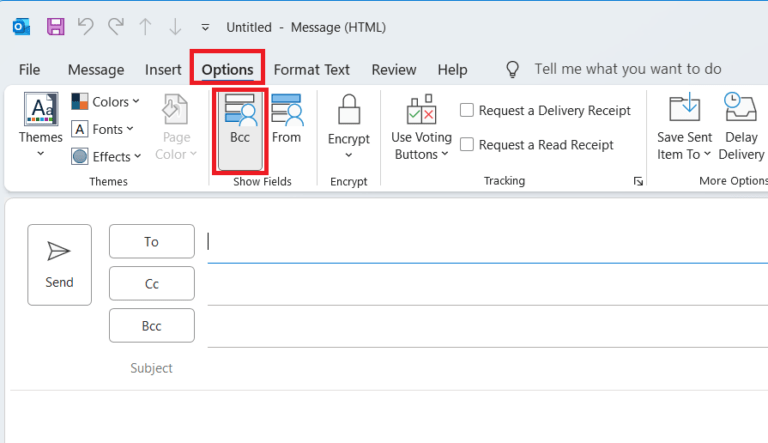
Outlook Desktop Application
- Open a new email message.
- Select the Options tab.
- Choose Bcc from the Show Fields section.
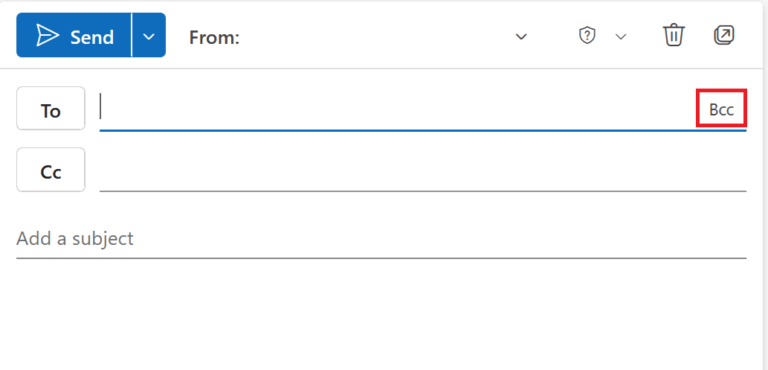
Outlook on the Web
- Open a new email message.
- Select Bcc in the top-right corner of the message window.
Piazza
Piazza is particularly well suited for large classes. It supports threaded class discussion and pushes email notifications to students automatically, reducing the need to manage large Bcc lists over time.
Refer to CTSI’s Using Piazza While Quercus is Unavailable guide for setup instructions and teaching suggestions.
Discussions
Two options can be used to support class discussion: Microsoft Word documents shared through OneDrive and Piazza.
Microsoft Word Documents
Microsoft Word documents shared through OneDrive can support short-term discussion and collaborative annotation activities. Instructors can share discussion prompts, readings, or questions in a Word document and invite students to respond directly in the document or through the Comments feature.
Manage Discussion Activities in Word
- Use headings or tables to help organize student responses.
- Consider assigning students to small groups using separate documents or sections of a document.
- Share documents using editing permissions while the activity is active.
- Change sharing permissions to view-only after the activity closes.
- Include clear instructions about where and how students should respond within the document.
Piazza
Piazza is well suited for ongoing class Q&A, peer support, and threaded discussion, and is particularly recommended for large classes.
CTSI’s Using Piazza While Quercus is Unavailable guide includes setup instructions and teaching suggestions.
Assignments
Microsoft Forms
Microsoft Forms can support short-term assignment collection and file uploads. Assignment instructions, rubrics, readings, and supporting materials can be shared alongside submission forms using OneDrive folders or links.
Create an Assignment Submission Form
- Sign in to Microsoft 365 using your U of T account and open Microsoft Forms.
- Select New Form.*
- Add a title that includes the course code and assignment name.
- Under Quick Start, select Upload file to allow students to submit files.
- Under Settings, keep Only people in my organization can respond enabled.
- Ensure Record name is enabled so student names and U of T email addresses are captured automatically.
- Use Preview to review how the form will appear to students.
- Select Collect Responses, copy the link, and share it with students by email or through a shared OneDrive folder.
Watch a 2-minute video walkthrough of the setup process in Microsoft Forms.
*Some instructors may choose to explore Microsoft Forms quiz features to support lightweight grading workflows. Refer to the Quizzes section below for additional information about Microsoft Forms quizzes.
Rubrics and Feedback
Rubrics can be shared using Microsoft Word documents or downloadable files through OneDrive. Instructors may also use comments, annotations, or tracked changes in Word documents to provide structured feedback on student work.
Instructors using Microsoft Forms for assignment collection may need to use separate workflows for returning grades and feedback, such as annotated Word documents, shared files, or email communication.
Quizzes
Microsoft Forms
Microsoft Forms quizzes can support short-term quizzes, knowledge checks, surveys, and low-stakes assessments. Forms supports multiple question types, including multiple choice, text, rating, ranking, and file upload questions.
Consult the A&S resource Using MS Forms for Quizzes for examples of quiz settings, grading workflows, and additional setup considerations.
Create Quizzes in Microsoft Forms
- Under Settings, enable Only people in my organization can respond to restrict access to U of T users.
- Enable Record name to automatically capture each student’s name and U of T email address.
- Use the start date and end date settings under Options for Responses to control quiz availability.
- Questions may also be shuffled to support quiz variation.
- Share the quiz link with students through email or a shared OneDrive folder.
- When distributing quiz links to large classes, use Outlook Bcc fields rather than the built-in Microsoft Forms email distribution tool.
Create a Quiz with Microsoft Forms provides an overview of question types and quiz features, while the CTSI Microsoft Forms Tool Guide includes a full walkthrough of quiz setup in Microsoft Forms.
Calendar / Scheduling
Microsoft Bookings
Microsoft Bookings can help instructors coordinate office hours, research consultations, presentations, or student appointments by allowing students to book available meeting times directly.
Microsoft Teams and Zoom
Microsoft Teams and Zoom can continue to support synchronous class meetings, office hours, and student presentations.
Opencast (OCCS)
Instructors using the Opencast Content Capture System (OCCS) to record live classroom lectures are encouraged to download recordings from Opencast and share them through a supported platform such as MyMedia. There is currently no direct student-facing access to Opencast recordings.
Access and Share Opencast Recordings
- Log in to Opencast.
- Access and download your recording (instructions PDF).
- Upload the recording to MyMedia.
- Share the MyMedia recording link with students through email or OneDrive.
Academic Content Retention Policy
Tech2U will retain your course content recordings on the OCCS server temporarily, for a maximum duration of one academic term. By the end of the term, all your content will be deleted from the server at the start of the next term. For example, Fall term content will be deleted at the beginning of Winter term.
You will receive a reminder email from Tech2U. You may then choose to store this content on your own MyMedia account, personal OneDrive account, or another content storing platform of your choosing. We cannot extend this deadline past the end date. Please ensure that you make plans ahead of time to move your content off the server.
Library Reading Lists
Instructors currently using Library Reading Lists for the Summer term are encouraged to contact Syllabus Service to investigate access options outside of Quercus, including the creation of direct links to their Reading List.
Email syllabus.service@library.utoronto.ca for more information.
Existing Tools Accessible Outside of Quercus
If you are already using the following tools, they can continue to be accessed independently of Quercus.
- Crowdmark and Gradescope for exam marking (divisional license required—not available across all of U of T)
- MarkUs for the submission and grading of student programming assignments
- JupyterHub for computational notebooks
- iClicker for surveys and polling activities
Using Tools Beyond U of T Approved Academic Tools
Academic tools approved for teaching and learning use at the University of Toronto have been reviewed for privacy and security considerations. Instructors who elect to use tools that are not institutionally approved must carefully consider what student information is required to access and use those tools.
The CTSI Tools Beyond Quercus resource for additional guidance on privacy, accessibility, student data, and the use of third-party tools.
Additional Resources
- How to Continue Teaching During a Quercus Outage (FASE Education Technology Office): Guidance on communication, content sharing, assignment collection, and online class meetings.
- Teaching Without Quercus at UTM (UTM): UTM-specific guidance on course communication, reading lists, assignment collection, Microsoft 365 tools, and virtual meetings.
- Teaching Without Quercus at UTSC (UTSC): UTSC-specific guidance on course communication, content sharing, online meetings, discussions, Microsoft Forms, Crowdmark, and collaborative Microsoft 365 tools.
- Arts & Science Teaching & Learning Resources (A&S): Additional guidance on Microsoft Forms quizzes, OneDrive content sharing, and collecting student work using Microsoft 365 tools.
Need Support?
CTSI staff are available to support communication, teaching activities, assessments, and course continuity.
Tri-Campus Support Options
Contact your local divisional educational technology support team through the Divisional Education Technology Support Contacts list. Local teams may have the most up-to-date guidance for your specific teaching context, tools, or workflows.
Submit a support inquiry through q.help@utoronto.ca
One-on-One Consultations
Book a virtual consultation with a CTSI staff member for individualized support related to your course, teaching activities, or technology workflows.