

If you have a student who has created and used multiple iClicker student app accounts in your course, follow the steps below to merge the student’s Gradebook and Attendance data into a single account:
iClicker
What Can I Use It For?
iClicker (commonly called “clickers”) is a classroom response system currently supported at the University of Toronto. iClickers are a great way to increase student engagement, especially in large classes, and provide immediate feedback on student understanding of the course material.
iClicker Events are one-time sessions that allow attendees to participate without accounts. They are great for when your priority is speed, and you don’t need to track performance over time.
- Once you start the event, attendees can enter a join code or scan a QR code and immediately participate. No account required.
- Just like courses, events allow you to run polls and see real-time results and feedback in the desktop app. You can also view results after events end.
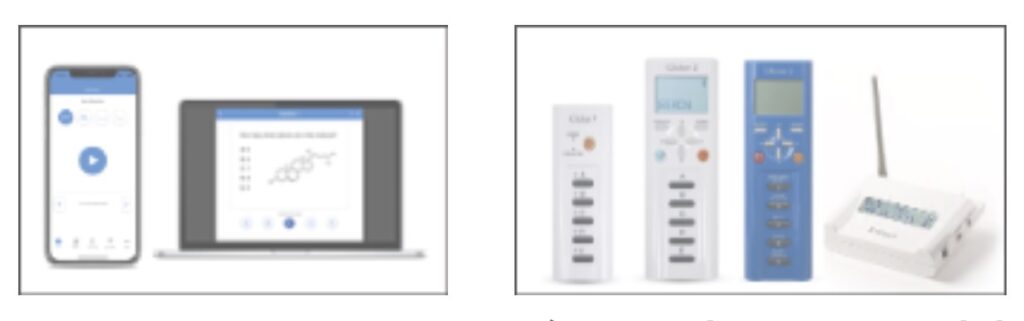
The full iClicker Cloud solution integrates with Quercus, and works in combination with presentation software like PowerPoint or Keynote. Instructors use the software to pose multiple-choice questions to students during class. Students can participate using mobile devices, laptops, and iClicker remotes, which transmit individual responses to the instructor’s iClicker account to record and share results with the class.
The full iClicker solution has a fee associated with it, usually paid for directly by students (although some departments may purchase the solution for their students; the exact arrangements should be confirmed on a departmental basis with the local EdTech support team).
Special Notes
Action Required: Update to iClicker Cloud 8.1.0 Ahead of Fall 2026.
Please be aware of an important change to the upcoming requirements: a new version of iClicker Cloud (8.1.0) is now available for download and is required ahead of the Fall term (all users must upgrade to version 8.1.0 instead of the previously announced version 8.0.0 to maintain uninterrupted service). This version will include additional accessibility updates and attendance tracking enhancements.
Key Dates to Note:
- Now Available: iClicker Cloud 8.1.0 is ready for download
- August 14, 2026: Minimum version enforcement begins
To avoid any disruptions as the Fall term begins, please ensure your systems are updated prior to the August 14 deadline.
Student Engagement – Not Formal Assessment
Please note that iClicker is supported for in-class audience response only. Instructors who wish to use this technology for formal assessment purposes should note that limitations with the technology, including WiFi and cellular connectivity, might limit the feasibility of using it for assessment.
Please be sure to check the minimum system and application requirements to run iClicker.
This Academic Toolbox tool helps you...
Connect With Students
The Academic Toolbox helps you...
Typical course activity format:
Synchronous
Typical Course Format?
Most tools in the Academic Toolbox can assist in both online and face-to-face courses. Many tools can provide benefits in either synchronous or asynchronous teaching. Some tools have been primarily designed for one format or another (synchronous/asynchronous), however, may be adapted for any format depending on your pedagogical goals.
To learn more about different teaching modalities, please consult our Online Teaching & Learning page, arrange a consultation with a CTSI Teaching Liason, or contact your Divisional support representative.
Quercus integration
Integrated tool
Where can I get more support?
Related resources / similar tools
Cost
Departmental
How to Get Started
Instructors, login to iClicker Cloud at: instructor.iclicker.com
(instructors and students must use their university email address when creating an account with iClicker)
Create your Courses in iClicker:
- When creating your course in iClicker Cloud, select the Enrollment option “Students must be invited to this course“.
- Once your iClicker course is created, in the settings area, select the “Integrations” tab and follow the Canvas integration prompts “Connect to Canvas” to select the Quercus course you wish to sync roster and grade information.
- Add your students to your iClicker course through Roster Sync.
All iClicker assignment and quiz setup occurs in the iClicker Cloud interface, not in your Quercus course.
iClicker “Events” can be setup as a standalone anonymous polling tool free of charge (no Quercus or course setup/sync required).
How to Use This Tool
The full iClicker solution has a fee associated with it, usually paid for directly by students (although some departments may purchase the solution for their students; the exact arrangements should be confirmed on a departmental basis with the local EdTech support team).
While students can purchase iClicker licenses directly from various app stores, we have partnered with the University of Toronto Bookstore to ensure that the best price for students is through the U of T Bookstore, and not directly from online app stores. We encourage instructors considering the adoption of iClicker for their teaching to contact the U of T Bookstore in advance of their teaching to ensure there is enough stock for all their students. The U of T Bookstore can also help with other related teaching inquiries.
While we note that some instructors are interested in using iClicker integrated with MacMillan’s Achieve system, Achieve is currently not supported at the University. Instructors should be aware of the guidelines regarding Tools Beyond Quercus before making this decision.
In addition to iClicker Cloud, instructors have access to other audience and student response solutions, included through their Microsoft 365 account or using the free of charge iClicker Events for standalone anonymous polling.
Instructions
-
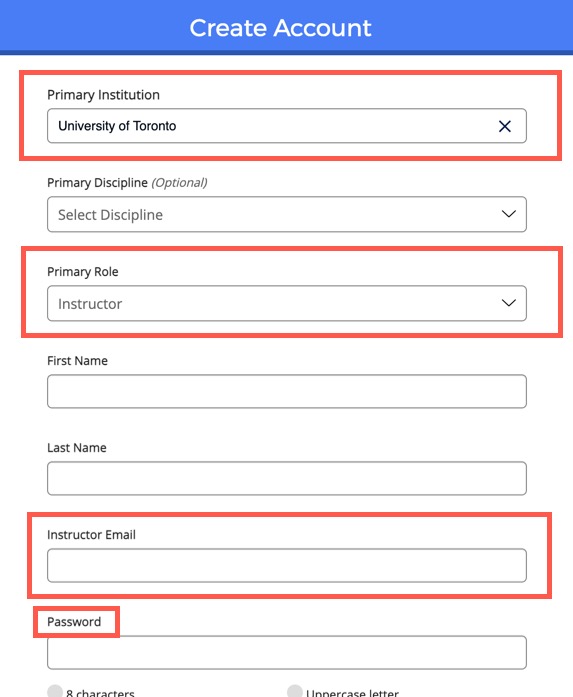
Create an account on the iClicker Cloud Instructor site (if you do not have one already).
- Search for and select “University of Toronto” as your Primary Institution.
- Select “Instructor” as your primary role.
- Use your @utoronto.ca instructor email address when creating an account.
- Do NOT use your UTORid password. This is a separate account from your University email & UTORid.
-
-
The iClicker course name that you create does not automatically sync with your Quercus course name.
Instructors should create an iClicker course name that matches their Quercus course & year.
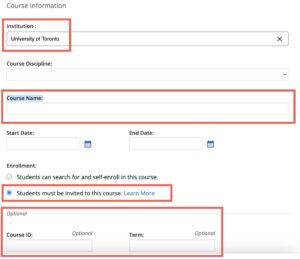
Choose Create New Course in your iClicker Cloud account with the following:
- Institution: Ensure “University of Toronto” is selected.
- Course Name: To ensure you are interacting with the correct course, match this name with the name of your course in Quercus. You may also want to include the section, semester and year information.
-
Enrollment: We recommend selecting the option “Students must be invited to this course.” *
- Optional: Adding the Course ID from Quercus and Term information will assist in keeping your iClicker courses organized.

Once your iClicker course is created, students can be added to the course via the Roster & Grade Sync.
* We recommend selecting the option “Students must be invited to this course” if you plan on utilizing the Quercus Roster & Grade Sync feature.
The “Students can search for and self-enroll in this course” option can be used if you are not using any of the Quercus syncing features. For example, if you are just taking surveys, knowledge-checks in-class, things like that to read the room but are not using iClicker for any important for assessment for which individual students need to be identified. A Join link and Join code can be shared as well if students are having difficulty finding or accessing the iClicker course.
Please reach out to iClicker directly if you have any questions about what type of setup is best for your situation.
-
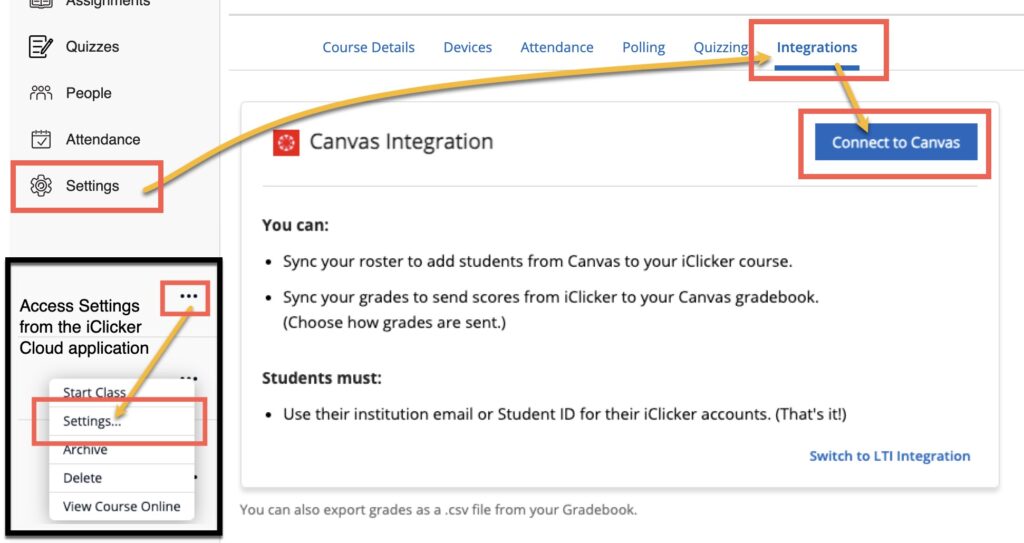
Once your iClicker course is created, you can sync assignment grades and cross-check roster information with the Quercus integration.
In the settings area of your iClicker Cloud course, select the “Integrations” tab and follow the Canvas integration prompts “Connect to Canvas” to select the Quercus course you wish to sync roster and grade information.
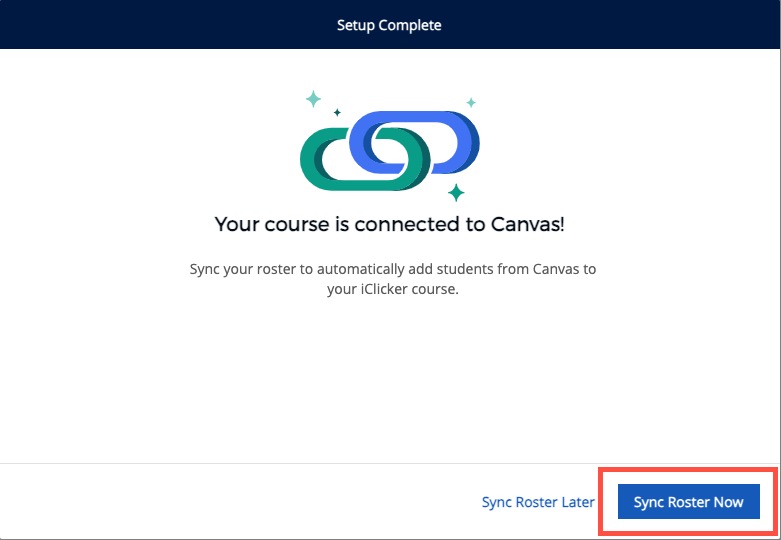
Once connected, you may do an initial Roster Sync with your Quercus course:
After completing an initial roster sync, you will be given the option to notify students who do not have an iClicker account setup yet.
An additional Roster sync will be required once
-
After following the steps to set up Roster & Grade Sync in your course, you can pull your roster from your Quercus course into your iClicker course.
Navigate to the People section of the iClicker Cloud instructor website and click the Sync Roster button on the Students page to initiate the roster sync.
Students from your Quercus roster are associated to an iClicker account by matching account information in the two systems. If a match is found and the student hasn’t yet joined your iClicker course, that student will get automatically added to your iClicker roster and sent an email notification. Student account matches use email address as the primary identifier but also use student ID and full name to supplement match success if an email match cannot be made.
Learn more about Sync your roster from Quercus to iClicker Cloud.
-
After following the steps to set up Roster & Grade Sync in your course, you can sync iClicker Cloud grade book with your Quercus course anytime.
A “Grade Sync” column appears in your iClicker Cloud gradebook when you have the integration active
Click the “Sync Grade” button on the “Gradebook” page to initiate the grade sync.
Note that a roster sync is automatically included with every grade sync to ensure that your roster is as up-to-date as possible before grades are sent.
Learn more about Sync your grades from iClicker Cloud to Canvas.
-
For full instructions, please consult the iClicker guide: How to Create an Event and Run Polls in iClicker Cloud.
- Events are setup with iClicker cloud, but to “run” the event, you need the iClicker application (floating toolbar).
- Events does not have any location option, only anonymous polling.
Creating an Event:
- Events can be accessed from the instructor website (instructor.iclicker.com) or desktop software (requires Cloud 5.6.0 or later).
- To create an event, click the Create New Event button from the instructor website or click the Create button from the desktop.
Sharing Event Information:
- Participants don’t need an iClicker account to join your event but they will need to know how to join it.
- If you are creating your event ahead of time and wish to send join information to participants, you can share the join link and/or QR code for the link.
- Although the join information can be shared ahead of running an event, participants will not actually be able to join the event until it starts.
Running an Event:
- To start an event, you must use the desktop application.
- Once started, an event can last up to 12 hours.
- For multi-day engagements, facilitators should create a separate event for each day.
-
1. Mobile app and/or hardware
The instructorsʼ computer requires internet (recommended via hard-wired ethernet cable). Students using the mobile app will need Wifi or to use their phone data.
2. Hardware only
Only the instructor’s computer requires internet access (recommended via hard-wired ethernet cable) to run the iClicker Cloud software. Students do not need WiFi as they connect iClickers directly to the local base station in the room.
-
When using iClicker in a physical classroom, you may use an iClicker Receiver Base. Using a base station is not required if the WiFi connectivity is good in your classroom and your students are using iClicker Cloud.
Using a base station can be beneficial if you are in a classroom with poor or unreliable WiFi access.
- St. George Campus: To obtain an iClicker Instructor Base, fill in this request form .
- UTM: Consult information about iClickers at UTM.
- UTSC: Contact quercus.utsc@utoronto.ca for information about iClickers at UTSC.
- St. George Campus: To obtain an iClicker Instructor Base, fill in this request form
-
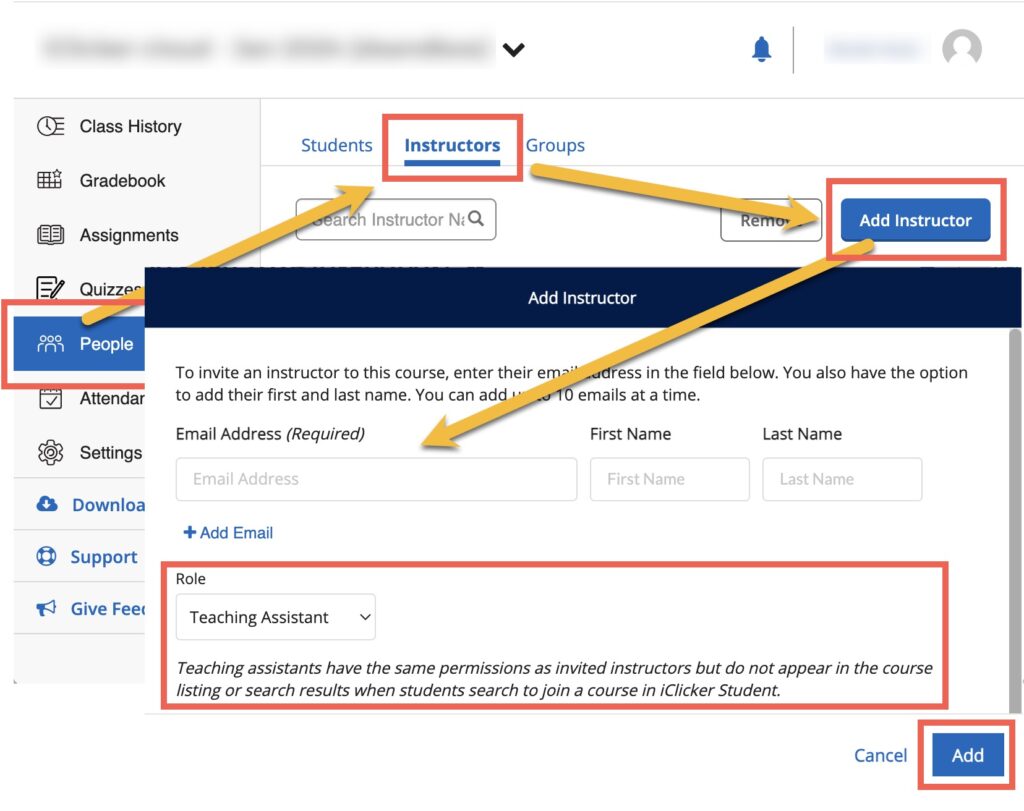
Instructors can share their iClicker Cloud courses with other users who will be assisting with the course like a co-instructor, TA/GA, or divisional ed tech support.
In the People section of your iClicker course, select the “Instructors” tab and then the blue “Add Instructor” button.
Ensure you are using their official University of Toronto email address.
The creator of the course is the course owner and maintains ultimate control of the course. This role cannot be transferred. Invited users can have either a co-instructor or teaching assistant (TA) role and will share almost all the same course permissions as the course owner.
Learn more on How to Share Your iClicker Cloud Course with a Co-Instructor or TA.
-
Polls vs Quizzes in iClicker:
- Polls are non-graded
- Quizzes can sync to Quercus grade book
- Polls are more limited and don’t have the same features as quizzes (for example, you can not embed images in polls)
-
iClicker Cloud Roster & Grade Sync with Quercus: How to Set Up Multi-Section Courses.
In this scenario, each Canvas section meets on a different day and/or time, but all feed into the same Canvas gradebook. Additionally, students are allowed to attend any section regardless of their actual section registration.
-
Guides
-
iClicker Cloud Instructor site
More assistance when using iClicker Cloud:
- Instructor Guide: iClicker Cloud Roster & Grade Sync with Quercus (Canvas)
Your Quercus roster is used to pre-populate your iClicker roster.
- iClicker Cloud Roster & Grade Sync with Quercus (Canvas): How to Set Up Multi-Section Courses
Click the Connect to Canvas button to authenticate your Quercus identity and authorize the tool.
- Instructor Guide: iClicker Cloud LTI Integration with Quercus (Canvas)
Add an assignment in Canvas From your Canvas course home page, select “Assignments” in the side navigation … Complete the new assignment form with the following information:
- How to Manually Upload Scores from iClicker Cloud to Canvas
Canvas attempts to match student data from either the SIS User ID (iClicker Student ID) … Canvas attempts to identify the uploaded assignments by name to update existing gradebook entries.
- Instructor Guide: iClicker Cloud Roster & Grade Sync with Quercus (Canvas)
-
-
Student Response Systems, additional resources:
Videos
-
Full iClicker Cloud training video from iClicker (not all features & functions apply to our Quercus integration)
Last Modified:
6 July, 2026
This work is licensed under a Creative Commons BY-NC-SA 4.0 International License