What Is Active Learning at U of T?
Active learning refers to instructional approaches that engage students in doing, observing, and reflecting—not just receiving information. It positions students as contributors to the learning process, rather than passive recipients.
At U of T, active learning involves:
- Collecting and synthesizing information, practicing critical thinking, and problem solving
- Connecting classroom learning to real-world or professional contexts
- Reflecting on one’s own learning needs and progress
- Sharing agency with peers and instructors in the learning process
This definition is grounded in the literature on active learning and was honed for the U of T context through interviews with faculty, administrators, and staff members. Some of the following information is adapted from the Teaching Assistants’ Training Program (TATP) guide on Active Learning and Adapting Teaching Techniques.
Active learning may include lectures and content delivery, but it complements them with opportunities for participation, practice, and reflection. These strategies align with Universal Design for Learning (UDL) principles by offering students multiple ways to engage, express, and reflect. Active learning is often supported by educational technologies or facilitated in flexible environments such as Active Learning Classrooms (ALCs).
Interested in designing or facilitating active learning at U of T?
Explore CTSI’s Active Learning Design Foundations (ALDF)—a self-paced learning program that helps you plan, implement, and reflect on active learning across a range of teaching contexts.
Active Learning Activities to get Students Interested, Engaged and Motivated
Types of active learning and how to use them in the classroom
- reading, thinking and speaking critically
- expressing ideas through writing
- examining personal attitudes and values
- giving and receiving feedback
- reflecting on the learning process
- class
- a bridging tool (at the beginning of class to assess prior knowledge)
- on the way out of class (e.g., as formative assessment)
- outside the class (in e.g., study groups, online discussion boards, etc.)
- individuals
- pairs
- small groups
- the entire class
How do I form ad hoc groups during a class?
- Ask students to form groups the people around them. For classrooms with fixed furniture, have students turn to the people behind (or in front) of them
- Ask students to form groups with people they don’t know who are around them. Have students introduce themselves first before working on the topic. For classrooms with fixed furniture, this may mean changing seats.
- Have the class count off (1, 2, 3, etc.) until you have as many groups as you need, depending on the size of the class. Then have all the 1s, 2s, etc., gather together to work on the assignment or activity.
- In online sessions, arrange students into assigned or random breakout groups
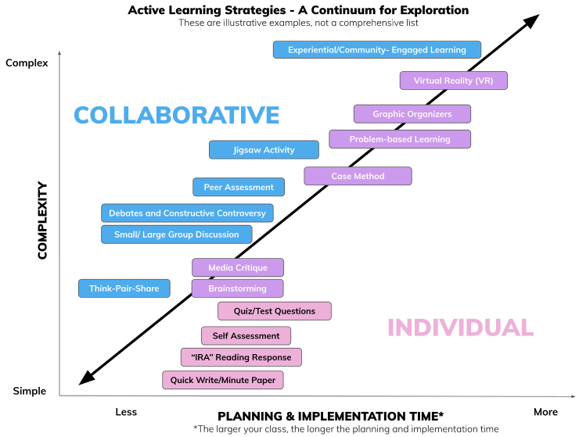
Simple to more complex active learning strategies
These examples are divided into individual (I) and collaborative (C) activities (some examples can fall under both categories).
Please keep in mind, the amount of time to plan and execute an activity may increase with the size of the class and the complexity of the activity.
or Minute Paper Activity
Low stakes writing exercises can be used to get the class thinking and to make connections between previous learning and the new day’s activity.
Low-stakes writing exercises are not graded. They’re focused on helping students overcome anxiety about writing. The point is to teach them that they can think by writing.
A Quick Write/Minute Paper asks the class to write for one minute in response to a question (or prompt) provided. The prompt should be focused and specific but open-ended enough to encourage thoughtful writing.
Watch a 2 minute video explaining the Quick Write activity from the K. Patricia Cross Academy.
Low stakes writing activities from the Teaching Assistants’ Training Program also provides good examples.
[Link: uoft.me/AL-QuickWriteMinutePaper]
Having students complete an “Insight, Response and Application” (or IRA) writing exercise upon completing a reading assignment challenges students:
- reflect on what they took away from the reading
- connect what they learned to their own personal experiences
- expand their understanding by seeking out further information to build upon what they learned
Watch a 2:30 minute video from the K. Patricia Cross Academy.
The TATP has other examples of low-stakes writing exercises to try.
Through self-assessment, students can:
- identify their own skill gaps, where their knowledge is weak
- see where to focus their attention in learning
- set realistic goals
- revise their work
- track their own progress
- if online, decide when to move to the next level of the course
This process helps students stay involved and motivated and encourages self-reflection and responsibility for their learning.
You should set clear expectations for student performance. As in peer assessment, you need to coach students on assessment criteria and how to apply them assessing their own work. Give them practice assessing themselves.
A valuable process on its own, self-assessment may be paired with peer assessment. Applying knowledge gained through peer assessment, students’ self-assessment can be a potent next step in actively promoting their own learning and achievement.
Watch a 4:45-minute video from Edutopia explaining how self-assessment is being used in an arts school.
[link: uoft.me/AL-SelfAssessment]
(Paulson & Faust, 2006)
This exercise asks students to become actively involved in the creation of items for tests and quizzes. The examples they come up with may be assigned for extra value or used on a regular class schedule to provide feedback to the student regarding whether they understand the content or not. In asking students to think up exam questions, we encourage them to think more deeply about the course material and to explore major themes, comparison of views presented, applications, and other higher-order thinking skills.
Beyond simply using example questions as a quiz or test, ask the students to evaluate the question submitted. In discussing questions, they will significantly increase their engagement of the material in order to generate answers. Students might be asked to discuss several aspects of two different questions on the same material including degree of difficulty, effectiveness in assessing their learning, proper scope of questions, and so forth.
Important: Identify how different questions access different information. For example, if you ask the question, “What is the formula of/for X?” then you are telling the student X is important. X may be a formula for a compound, a mathematical equation or logical argument. Whereas if you ask how does X act when it is in the presence of “Y” or “What are the units of X?” and “How does X evolve as you increase variable Z?” then you are asking for a basic understanding of X and the relationship between X and Z. In soliciting questions it is important for the student to understand the different complexities and different levels of thinking associated with complex problems.
Watch a 2-minute video from the K. Patricia Cross Academy explaining a Quiz and Test Questions activity.
[link: uoft.me/AL-QuizQuestions]
(Kagan, 1990)
Think-Pair-Share (TPS) is a cooperative structure in which partners privately think about a question (or issue, situation, idea, etc.), then discuss their responses with one another. As a relatively simple structure that can be implemented quickly, TPS can be incorporated into almost any form of instruction. It is particularly useful for actively involving all students during lectures.
Procedure:
- Instructor poses a question, statement, issue or prompt to the class.
- Instructor provides an amount of time for individual thinking (students can mentally rehearse or jot down ideas).
- Instructor asks students to pair up and share responses. Students may clarify and elaborate.
- Instructor can randomly choose a number of pairs to share their responses with the class.
Watch this 2-minute video from the K. Patricia Cross Academy.
[link: uoft.me/AL-ThinkPairShare]
Brainstorming is a large or small group activity that encourages students to focus on a topic and contribute to the free flow of ideas.
- The instructor may begin a brainstorming session by posing a question or a problem, or by introducing a topic.
- Students then express possible answers, relevant words and ideas.
- Contributions are accepted without criticism or judgement and usually summarised on a whiteboard by the instructor or a student scribe as the ideas are called out.
- These ideas are then examined, usually in a open class Discussion format.
Watch:
- A Better Way to Brainstorm: How to Get Students to Generate Original Ideas [Video]
- Brainstorming [Video]
- Brainstorming [website]
[link: uoft.me/AL-Brainstorming]
“Media critiques dissect popular film, television, novels and other forms to explain to a broad audience how, in academic terms, these cultural artifacts can be reflective of social issues, evidence artistic accomplishment, offer critical voice to power and much more. Often taking the form of a visual essay, the media critique requires researching, editorializing and translating both written and visual source materials into a cohesive, understandable whole.”
Reference:
Penn State Teaching and Learning with Technology
[link: uoft.me/AL-MediaCritique]
Setting Expectations:
- When facilitating a discussion, start by creating shared norms for participation on the first day and setting the stage and tone of the class.
- Provide learning goals at the beginning of the discussion session and then let students know that you will check back in with those learning goals and provide summaries periodically.
Questions:
- When writing discussion questions, start by accessing prior knowledge, using familiar vocabulary, and, when possible, asking questions that have more than one potential answer.
- When delivering questions, give students time to think about their answers before responding. Remember that the way you ask questions also models good questioning to your students.
- While facilitating discussion, it is imperative to provide positive, reinforcing feedback both through verbal and non-verbal cues. This can decrease insecurities around participation.
- If student contributions are totally off track, instead of pointing out where a student is wrong, redirect them to the issue at hand and say, for example, “That’s an interesting point. Can you explain how it connects to the topic?”
Invite and Answer Questions:
- Navigating irrelevant questions without demoralizing the class and still encouraging students to ask questions can be tricky.
- Let your students know that questions that seem simple are just as welcome as questions that seem complex. But also let them know that some questions you will need to bounce back to the class.
- For example, a question that is clearly answered in the syllabus should be answered by students or a question that will be more beneficial to students if they find the answer themselves rather than you providing the answer on the spot can also provide a useful learning experience.
- For all class sizes, but especially those with more than fifty students, consider setting up an online discussion board of frequently asked questions and invite students to contribute. With an online discussion board, all students can benefit from reading each other’s questions.
Recommendations for Leading Discussion:
- Use small group discussion to stimulate the conversation. When students have a chance to chat in smaller groups they may be less anxious to talk in front of the whole class (since they have already practiced with their peers) and thus, be more likely to participate in large-group discussions.
- It is also important that we explain that active engagement is important for student learning.
- Let students do the talking; aim to talk only twenty to thirty percent of the time.
- Remember to close the session. Save at least five minutes at the end of class to check back in with the discussion’s learning goals and check for student understanding
Watch a 2-minute video where Teaching Assistants’ Training Program (TATP) staff member Kathleen Ogden explains how to support students to share their thoughts in a group.
[link: uoft.me/AL-GroupDiscussion]
Formal and informal debates are active learning activities that build upon course material to encourage structured participation and group work.
The University of Waterloo’s Centre for Teaching Excellence offers steps outlining possible procedures for an in-class debate:
- Describe the background context, and explain why you are having a debate.
- Consider establishing ground rules for the discussion (ex. Disagreements are welcome, name calling and interruptions are not).
- Decide on the two (or more) sides to the debate.
- Physically group the class according to points of view: either assign students a point of view depending on where they sit, or ask people who want to argue each point of view to move to sit together.
Invite someone from one side to begin the debate by stating his/her point of view. - Invite someone from the other side to state the opposite point of view.
- Open the floor to comments that question or expand on the issues that were raised.
- For large groups, you may want to have speakers raise their hands while you moderate, but for small groups, anyone can speak up.
- The debate will probably start slowly at first, but the intensity should pick up as the students become more comfortable with the new style of in-class interaction.
- You, as an instructor and moderator, can ask provocative questions, but don’t express judgment on any point of view or students will hesitate to bring out new ideas for fear of being embarrassed.
- After 10 to 15 minutes of debating, end the debate.
A variation on debates is call Constructive Controversy. This strategy is contrasted with debates which can foster a competitive process where there is a “winner.” Constructive Controversy involves deliberate discussions that result in creative problem solving. See the references below for a description of this process
Watch a 1-minute video from McGill Teaching and Learning Services which describes how a critical debate can be used to engage students both in and outside of your classroom around a relevant topic or idea.
[link: uoft.me/AL-Debates]
Feedback from peers can serve as a formative assessment technique. Students, upon viewing and assessing the feedback given to them for their work from their peers, are then asked to revise and resubmit their assignment. An instructor or TA provides the final evaluation of the work while, noting the appropriateness of the revisions made to it, as well as the quality and richness of the feedback they have provided to others, thus grading both the product and the process.
Watch a 2:21-minute video from CTSI which discusses how peer assessment can tap into students’ critical thinking skills.
Learn more about peerScholar, an online peer assessment tool.
[link: uoft.me/AL-PeerAssessment]
Pioneered by the Harvard Business School, the Case Method uses real world problems or issues and tasks students with the challenge of addressing various constraints to eventually arrive at some desired solution or goal.
To structure a basic Case Method assignment you:
- Present students with a case and ask them to position themselves as decision makers as they read through and identify the specific challenge(s) presented in the case.
- Students analyse the case and consider various actions and solutions to inform a set of recommendations.
- After students read and reflect on their cases, instructors may decide to group students in learning teams to discuss their cases with other students in small groups.
- As a large group, the instructor guides the students to probe underlying issues, compare alternatives, and offer recommendations that align with the goals and objectives of the stakeholders in the case (e.g., an organization).
Watch a 3-minute video explaining the Case Method activity from the K. Patricia Cross Academy.
Also see:
Barkley, E.F. & Major, C.H. (2016). Learning assessment techniques. Jossey-Bass.
- Note: Section on Case Study, pages 243-247.
[link: uoft.me/AL-CaseMethods]
(Aronson, 1980)
The Jigsaw reading activity provides a way for students to learn new content and also provides an opportunity for them to teach each other what they have learned and discuss implications of the reading. A basic Jigsaw is structured as follows:
- Arrange cooperative groups (e.g., a group of 4) and assign materials
- Move to expert groups and prepare ideas for teaching (e.g., a section of an article or chapter)
- Return to cooperative groups for teaching and checking for understanding (e.g., groups of 2 or 3 students who read the same assigned material.
- Individual and group accountability
Watch a 2-minute video explaining the Jigsaw activity from the K. Patricia Cross Academy.
[link: uoft.me/AL-Jigsaw]
Problem Based Learning (PBL) is a hands-on active learning strategy that engages students in solving problems they might encounter in the real word. With PBL activities, instructors take the position of facilitator, fuelling students’ inquiry and helping them to apply the knowledge they have learned in the course to real life situations.
With PBL, students encounter challenges that are open-ended with no one “right” answer and they are challenged to work within a specific context. PBL can be a self-directed activity or students can work together in small collaborative groups.
Instructors may use PBL in their courses to nurture students’ critical thinking skills, problem solving skills, knowledge application and as a means to engage students more deeply, making the course content relevant to the world in which they live.
Watch a 2:26-minute video from the K. Patricia Cross Academy which describes a technique called “Triple Jump” which can be used to engage students to think through real-world problems.
University of Toronto Libraries has a guide on Problem Based Learning (PBL) as a Pedagogical Approach.
[link: uoft.me/AL-ProblemBasedLearning]
Graphic organizers are learning devices that encourages students to process information using both words and graphic images. Graphic organizers can be used for a variety of teaching and learning contexts, including:
- note-taking to help students retain and retrieve information
- support and organization of lecture content – a way for instructors to synthesize the content of a lecture to students
- essay writing, as a tool to organize thoughts and ideas
- in groups, for students to process or review course content
With graphic organizers, learners are taught how to arrange content visually in order to understand how various course topics and concepts are related.
Watch a 2:12 minute video from the K. Patricia Cross Academy which describes how to use one type of graphic organizer, Sketch Notes with students.
Other resources:
- Sketchnoting Resources for Teachers (google docs)
- The great and powerful graphic organizer [blog post]
[link: uoft.me/AL-GraphicOrganizers]
The University of Toronto’s Centre for Community Partnerships describes community-engaged learning as an academic or co-curricular practice whereby students spend time supporting the work of a community organization and reflecting on their efforts and learning as part of the overall experience.
[link: uoft.me/AL-ExperientialLearning]
Virtual Reality, or VR, uses computer technology, head and body tracking and computer and/or an input device (such as a VR headset) to create a simulated environment which can be explored in 360 degrees. VR places the user inside a virtual environment to give an immersive experience.
Within the classroom, VR is emerging as an innovative tool, engaging multiple learner styles and enabling students to more deeply explore, experience and ‘feel’ the content or topic. While there exists great potential integrating VR into university classrooms, instructors must be mindful that the focus remains connected to the student learning experience and broader learning goals of the course.
Augmented reality, or AR overlays the user’s visible work with some form of digital content. The user usually views AR through a smartphone or tablet.
Watch a 4-minute video from Educause which explores the benefits of Virtual Reality in a variety of learning settings.
Virtual and Augmented Reality for Learning:
- Part 1: Terminology and Technology [Video]
- Part 2: Pedagogy [Video]
- Part 3: Examples and Methods [Video]
Harrison, L., & Michaud, D. (28 Feb. 2020), University of Toronto
How can I scale up active learning activities for large groups of students?
Items in this section were adapted from the Teaching Assistants’ Training Program’s Active Learning and Adapting Teaching Techniques guide.
(Irvine et al, 2006)
Purpose: This activity is designed to help students access prior knowledge. It promotes connection between students and allows the teacher to also get some feedback about prior learning.
Procedure:
- Have students fold a piece of paper lengthwise to form two columns and write “Give One” at the top of the left-hand column and “Get One” at the top of the right-hand column.
- Ask students to brainstorm a list of all the things they already know about the topic they will be studying by writing the items down in the left-hand column. You may want to give them a specific number of bullets to guide the amount of responses.
- After making the list, have students stand and find a partner. Each person should “give one” of their ideas by saying it out loud. Partners take turns sharing.
- Have students write any new information they get from these discussions in the “get one” column of their lists, along with the name of the person who gave them the information.
- Students should rotate around the room, talking to two or three partners.
- Once everyone has given and received information, the whole class can discuss the information students have listed.
Scaling Up Tip: Invite students to connect with the people in their immediate area. Be clear how many people they should connect with and the procedure they should use to determine who to connect with.
[link: uoft.me/AL-GiveOneGetOne]
Purpose: This activity is also called an exit ticket and it provides an opportunity for the students to give low risk/stakes written feedback to the teacher. It allows the teacher to also get some feedback about student learning and even measure the effectiveness of different learning strategies being used in class.
Procedure:
- At some point during the class, identify a question that you would like to have students answer and let them know that answering this question will be their ticket out the door. You can even provide them with a small piece of paper that has the question written on it.
- Remind students before the end of class and then give students a few minutes at the end of class to write their response.
- Make arrangements to collect the tickets. You might have students place them in a box at the door or, you may want to stand at the door and collect them yourself.
- As with any learning activity and assignment, teacher feedback is important. It is the essential element to making the activity successful. You must do something with the work in order for the student to know that his effort has been noticed and honored. This could include sending a summary to students by email or responding to their responses at the beginning of the next class.
Scaling Up Tip: This activity can be adapted for large scale classrooms with the use of small groups. Follow up by the instructor can happen in the next class or online.
[link: uoft.me/AL-TicketOutTheDoor]
(Kagan, 1994)
Purpose: This cooperative technique provides an opportunity for learners to deepen their understanding by exploring issues and expressing opinions. The technique can energize a lesson by providing movement and interaction with peers.
Procedure:
- Post the dimensions related to the topic in each of the four corners of the room (e.g., strongly agree, agree, disagree, strongly disagree or number four different pictures and then post the numbers).
- Each student selects a particular dimension in response to a question posed by the teacher, and moves to the appropriate corner.
- Once in their selected corner students pair up to discuss the reason(s) for their choice.
- Students listen actively to their partner’s response and are prepared to share what they heard their partner say.
- The teacher randomly chooses partners to share responses from each corner.
Scaling Up Tip: This is an activity that can be adapted to a large scale classroom with a few structural changes. Rather than posting a question or number in four corners, post a diagram of the room on the screen (on a PowerPoint slide), clearly marking where students should move to identify with a particular dimension or image. The rest of the lesson could proceed as with a smaller classroom. You can also use a stopwatch so students have access to the same timing as you.
[link: uoft.me/AL-FourCorners]
(Rolheiser, 2011)
Purpose: 3 – 2 – 1 is a graphic organizer that learners use to record ideas, observations and/or reflections related to a specific learning experience.
Procedure:
- Instructor provides each learner with the 3 • 2 • 1 graphic organizer, including prompts e.g., “List 3 – Important points from today’s lecture. 2 – Limitations of this perspective. 1 – Question I still have is…? Or 1 point that was unclear was…?”
- Learners reflect on the questions posed and record their ideas on the 3 • 2 • 1 graphic organizer (e.g., after viewing a video, listening to a panel presentation or guest speaker, engaging in a service-learning activity, reflecting on a personal experience, etc.).
- Learners then share their ideas with others (e.g., Think Pair Share-Technique).
- The instructor listens for patterns in the students’ responses and uses these to debrief or link to the next part of the instruction.
Scaling Up Tip: This is an activity that would work well with a larger scale classroom because it involves individual reflection. Students can respond individually in their seats. Students can either share some of their responses in class and/or you can collect their papers as a Ticket out the Door, compile their responses and then provide a response to students either online or in the next class.
[link: uoft.me/AL-321]
(Barkley, Cross & Major, 2005)
Purpose: Students work in pair to improve their note-taking, writing and organization skills. Often times there are gaps in students’ notes and with this collaborative learning technique, students are given time to check, compare and correct their notes with a partner.
Procedure: After notes from a lecture have been taken.
- Choose to do during breaks in the lecture or at the end of the lecture. Students are given time to pair with their neighbour to compare and review notes.
- Have partner A summarize one section with their partner highlighting the main points and identify ambiguous concepts and questions that they have.
- Partner B clarifies/shares their thoughts based on their notes, filling in the gaps. Remaining questions should be brought and discussed through a Fish Bowl or posed to the class.
- Partner A and B switch jobs for the next section.
- Repeat until all of the notes have been revised. Be sure to take time to respond to remaining questions.
Scaling Up Tip: This activity works really well in a larger scale classroom. In order to reduce the amount of time that it would take to answer the remaining questions (see question 3 above), you could have students submit their remaining questions to you as their Ticket Out the Door and you can respond to remaining questions either online or at the beginning of the next class.
[link: uoft.me/AL-NoteTakingPairs]
(Short et al., 1996)
Purpose: This activity provides students with an opportunity to engage with a text and then respond to it in a low risk situation. It can be used as a tool to build further activities on.
Procedure:
- Working in pairs, the students typically read a text up to a set point (e.g., the first page, the end of a section).
- They pause and “say something” about what they’ve read to their partner. They may, for example: summarize the section; identify a key point; make a connection to their own work.
- You can repeat this process of pairs reading then discussing if time allows.
- Combine pairs so students engage in small group discussion. Provide prompts.
- Continue the discussion with the whole class.
Scaling Up Tips: This activity can easily be adapted for large scale classrooms. There are some strategies that would make this process easier:
- Dividing students up into groups has the potential to take a long time. Give clear instructions about the division as you don’t want them to move too much. Suggesting they turn and pair with someone sitting in front or beside is a quick way to do this.
- When you are changing over to the small groups (i.e., 2 pairs), instruct students to turn to someone at their table or in the near vicinity.
- You can put a stopwatch on the projector so students have access to the same timing that you are using.
- If you do not have enough time for a larger group discussion about the issues, assign questions for students to answer in an online discussion board or through an assigned reflective journal due online before the next class. Once you have read student responses, you can summarize the main points in the next class.
[link: uoft.me/AL-SaySomething]
(Paulson & Faust, 2006)
Purpose: To encourage students to offer feedback on course readings or class discussion. It is often more helpful and engaging to get students to provide the answers to their peers.
Procedure:
- Students are given index cards, and asked to write down one question concerning the course material. They should be directed to ask a question of clarification regarding some aspect of the material or, perhaps, application of course material to practical contexts.
- At the end of the class, students deposit their questions in a fish bowl.
- The instructor then draws several questions out of the bowl and answers them for the class or asks the class to answer them.
- This technique may be combined with many other questioning techniques.
Scaling Up Tip: This particular activity is well suited to large scale classrooms. It allows students some anonymity but also provides them with an opportunity to receive feedback from you, in answer to their different questions.
[link: uoft.me/AL-TheFishBowl]
(Paulson & Faust, 2006)
Purpose: Students typically can generate more comprehensive lists working in groups than they can alone. This method is particularly effective when asking students to compare views or to list the pros and cons of a position.
Procedure:
- Have students make a list of opposing points or arguments on paper or on the blackboard using a pro/con list.
- Once students have generated as thorough a list as they can, have them analyze the lists by asking questions that are appropriate to the exercise.
Scaling Up Tip: Student board work would be difficult in a large-scale classroom but paper and markers would work well. You could have a large group discussion, asking each group to share one “pro” and one “con”. Collect the papers at the end of class to ensure you have a good sense of the discussions that occurred. These pros and cons can be tabulated and you can follow up with discussion either online or in class the following week.
[link: uoft.me/AL-VisualLists]
(Barkley, Cross & Major, 2005)
Purpose: Structured Problem Solving provides students with a process for solving a complex, content-based problem within a specified time limit. All members must agree to a solution and must be able to explain both the answer and the strategy used to solve the problem. It helps students identify the logic approach behind the problem and identify where their logic fails by providing them with the steps to working out the solution to the problem.
Preparation: Create a problem that is complex enough to require the students to use sophisticated problem solving skills. Use research and current questions as a resource. Identify the problem and the logical steps required to devise a solution. Solve the problem yourself using the procedure you’ve established in order to uncover problems and difficulties or error present.
Procedure:
- After problems are developed, organize students into groups or teams and assign each group a problem.
- Ask students to solve the problem using the steps provided. For example you may use Dewey 6-step Problem Solving technique.
- Identify the problem
- Generate possible solutions
- Evaluate and test the various solutions
- Decide on a mutually acceptable solution
- Implement solution
- Evaluate solution
- Ask teams to report/present their problem, solution and the method (steps) they took in solving the problem.
Scaling Up Tip: This activity could easily be adapted for large scale classrooms. There are some strategies that would make this process easier:
- Give clear instructions about forming groups, e.g., turn and make a group with 2-5 people sitting nearby.
- Put a stopwatch on the projector so students have access to the same timing that you are using.
- If you don’t have enough time for a larger group discussion about the issues, assign questions for students to answer in an online discussion board or through an assigned reflective journal due online before the next class. Once you have read student responses, you can summarize the main points in the next class.
(Sharan & Sharan; Bennett et al., 1991)
Purpose: Group Investigation is a cooperative structure that enables students to plan and carry out a course of study. This structure is complex but students are involved in multifaceted learning tasks that demand greater autonomy and group self-direction.
Procedure: There are 6 main stages
Stage 1: Grouping
- Present topic and use several key questions to define the scope of inquiry. Students may scan a variety of resources to activate their prior learning and stimulate inquiry.
- Develop a list of questions that the students would like to investigate. You may guide this or have the entire class brainstorm together.
- Classify questions to create sub-topics.
- Students select subtopics of interest and form cooperative groups. Ensure that the groups have a good mix of contributors.
Stage 2: Planning
- Each group explores its subtopic and formulates a research problem. Focus questions are developed to outline the scope of inquiry.
- Develop an action plan. The group decides:
- aspects to investigate
- deadlines for reporting back
- resources needed
- Assign or have students select jobs and responsibilities.
Stage 3: Investigating
- Group members complete an action plan for each investigation day.
- Gather data from resources.
- Assess the relevance of the data related to the question.
- Members share their data to solve the group problem.
Stage 4: Organizing
- Determine the presentation format. It may be a presentation, poster, etc.
- Members discuss individual roles for the presentation and complete a presentation plan.
- Individual assignments are complete to form the report.
Stage 5: Presenting
- Present the reports.
- Other groups may seek clarification or give feedback.
Stage 6: Evaluating
- Establish the criteria in advance and use a rubric.
- Clarify the components. This may include:
- teacher and student evaluations
- formative and summative evaluation
- weighting of the process and the product
- ratio of individual to group marks
- Be sure that the students understand at the beginning how they will be evaluated. Students may complete a self-evaluation and add it to their portfolios. Teachers may also require an individual report or testing of the material after the final presentation.
Scaling Up Tip: In order to run this activity effectively with a larger group of students, you need to ensure the process is clearly outlined. In order to have an accurate picture of the individual role in the group, you may want to have students hand in process journals that contribute to their final mark.
[link: uoft.me/AL-GroupInvestigation]
(Kagan, 1994)
Purpose: Students have the opportunity to learn to identify and assess their own view and understanding. They also become aware of and appreciate other perspectives. This is also a good strategy for a facilitator to use to open a discussion about a particular subject.
Procedure:
- Draw a line on the floor with a piece of masking tape.
- Present an issue or topic to the group and ask each member to determine how they feel about the issue (could use a 1-10 scale; 1 being strong agreement, 10 being strong disagreement).
- Form a rank-ordered line and number the participants from 1 up (from strong agreement to strong disagreement, for example).
- Form groups of four by pulling one person from each end of the value line and two people from the middle of the group (for example, if you had 20 people, one group might consist of persons 1, 10, 11, 20).
Scaling Up Tip: Invite students to raise their hands based on the different value statements. As the facilitator, take note of the approximate number of students who identify with the different value statements. At the end of the activity, recap what you saw from your vantage point and then invite comments from the different levels of agreement.
[link: uoft.me/AL-LineOfAgreement]
(Romain, 2014)
Purpose: It can sometimes be difficult to gauge the different areas that students need clarification on. This activity provides you with an opportunity as an instructor to determine different areas of the course content that are causing ‘blockages’ for students. Once the blockages have been determined, you can address them with the class.
Procedure:
- Create a list of 10-15 questions based on major themes/ideas of course content.
- Integrate the open-ended questions into a simple PowerPoint Presentation and set the slides to transition at a 20 (to 30) second interval.
- Instruct students to get into pairs and to discuss the correct answer for each question as it emerges.
- While the slides are progressing, circulate through the classroom and listen to the discussion that the students are having about each question. Make a note of places where they are having difficulty, where there are blockages.
- Back in the larger group, ask students to share the ‘answers’ and to indicate areas where they feel that they need clarification and address those topics.
- Follow up with a list of the questions and the answers generated through the activity, as well as areas for further support and send the materials to students as an email or post them online.
Scaling Up Tip: This is an activity that would adapt well to any size of classroom. As the scale increases, allow for more time to complete the activity.
[link: uoft.me/AL-FlashReview]
(Reid, 2014)
Purpose: To provide students with an opportunity to think critically about the course material, to draw out students’ misconceptions about an issue related to course content.
Procedure:
- Ask students open-ended questions about the subject to determine their pre-existing knowledge about the subject and to draw out their misconceptions.
- Once you have generated a list of the misconceptions, divide students into small groups and give the students some questions to help guide their discussion. Invite students to think ‘outside of the box’ and come up with another solution.
- Invite groups to share their alternative solutions, their ‘a-ha’ moments that have emerged through their discussion.
- Clarify with the larger group the new method for understanding the problem or issue that has arisen through student observation and discussion.
Scaling Up Tip: Make sure you allow for additional time. Send the clarifications and summaries to class as email afterward or post online. It will help to make sure that students are on the “same page”.
[link: uoft.me/AL-ElicitConfrontResolve]
(Adapted from Judith Gray, Seattle, WA 2005)
Purpose: The purpose of this discussion format is to give each person in the group an opportunity to have their ideas, understandings, and perspective enhanced by hearing from others. With this format, the group can explore an article, clarify their thinking, and have their assumptions and beliefs questioned in order to gain a deeper understanding of the issues.
Procedure:
- Form small groups (3-people) and identify a facilitator/time-keeper for each group (who also participates).
- Each participant selects one “most” significant idea (and excerpt) from the article.
- First person shares this “most” significant idea and refers to the selected quote/excerpt. Share why the quote was chosen:
- do you agree/disagree?
- does it relate to your teaching/research?
- what questions arise?
- what issues are raised?
- what do you now wonder?
- Continuing around the group, each person responds to that quote and what the presenter said, briefly, in less than a minute. The purpose of the response is:
- to expand on the presenter’s thinking about the quote and the issues raised for him or her by the quote
- to provide a different look at the quote
- to clarify the presenter’s thinking about the quote
- to question the presenter’s assumptions about the quote and issues raised (although at this time there is no response from the presenter)
- After each person in the group has responded for one minute, the first person who began now has the “final word”. In one minute the presenter responds to what has been said:
- now what are you thinking?
- implications?
- what is your reaction to what you’ve heard?
- The cycle continues for each of the other group members, beginning again by sharing a significant idea from the text. Proceed around the group responding to this next presenter’s quote in the same way as the first presenter’s.
- For each round, allow about 6 minutes (groups of 3 participants: presenter 3 minutes, response 1 minute for 2 people, final word for presenter 1 minute). The role of the facilitator is to keep the process moving, keep it clear and directed to the article, and keep time so everyone gets an opportunity for a round.
Scaling Up Tip: With a larger group, you need to change the way that you introduce the activity (i.e., simplify instructions, and make sure that they are both on the screen as well as on a handout so that people can refer to it). You also need to change the way that you facilitate the sharing, therefore simplifying the process.
[link: uoft.me/AL-TheFinalWord]
Classroom Management: Active Learning Classrooms
Active Learning Classrooms (ALCs) are designed to promote interactive and collaborative student learning experiences. While ALCs provide many opportunities for innovative teaching and engaged learning, these classrooms can also pose specific teaching classroom management challenges, especially for instructors teaching in an ALC for the first time.
Active learning activities may run too long and take the class off track:
- communicate learning outcomes for the activity so students know what to focus on
- give students clear oral and visual instructions and emphasize time on task (e.g., tell them how much time they have, use a visual timer for students to monitor their own time, and signal when the activity is coming to a close)
- check in during the activity to see if there are any questions
- smaller groups (twos, threes, fours) will take less time than larger groups (greater than four)
Advanced audio-visual technology in some ALCs can be intimidating:
- book a practice session to learn the room features before your first class
- if the room is a University of Toronto Learning Space Management (LSM) room, reach out to LSM for tech support
- start small – design learning around the features that will have the greatest impact and the ones you’re most comfortable with (e.g., white boards)
- if possible, enlist TAs to help manage classroom technology
ALCs may lack a single central focus point and students may have their back to you:
- pick a point in the room (e.g. whiteboard, main screen, podium) and use a consistent cue to get students to focus
- there when necessary to come together as a large group
- use a ‘stage blocking’ technique to select a strategic point where most students can see you. For more information on ‘stage blocking’ in the classroom, refer to the following resources from the University of Iowa:
- leverage the room layout to circulate among groups of students, especially during activities
- consider various room layouts that meet your pedagogical goals, as most ALCs offer flexible options for room configurations
Engaging learners in high enrolment classes through active learning requires a combination of individual and group activities:
- use polls (e.g., iClickers) to get all students to participate individually and/or in small groups
- design group work around problem-solving and decision-making rather than writing and presenting
- allow some time for individual work
- use classroom technology to allow students to share their ideas with the larger group – not all groups need to
- share so utilize various sampling techniques
Students used to a lecture format may be reluctant to participate in active learning activities:
- use your syllabus to communicate expectations and model active learning from the very first class
- share research findings with students that highlight the benefits of active and collaborative learning. Example research articles are included below:
- STEM courses: Freeman, S., Eddy, S. L., McDonough, M., Smith, M. K., Okoroafor, N., Jordt, H., & Wenderoth, M. P. (2014). Active learning increases student performance in science, engineering, and mathematics. PNAS Proceedings of the National Academy of Sciences of the United States of America, 111(23), 8410-8415.
- Arts & Science courses: Mello, David and Less, & Colleen A. (2013). Effectiveness of active learning in the arts and sciences. Humanities Department Faculty Publications & Research. Paper 45.
- involve students in the process of setting course expectations (e.g., group norms, signal for attention, etc.)
- make students responsible for some output (e.g. in group work, assign roles to encourage participation)
- have clear learning outcomes and activities that are meaningful, challenging, and consequential/connected to what they are learning in class and to the real world
- if you have TAs supporting your course, provide information and training regarding their role in classroom management and engagement
Digital devices, noise from activities, and visual cues from classroom technology can lead to distractions:
- communicate clear policies on use of digital devices (e.g. for class activities only or only during designated times). For more information on managing the use of digital devices in the classroom, refer to the following resources:
- CTSI Video: Managing Digital Distractions
- Neiterman, E., & Zaza, C. (2019). A Mixed Blessing? Students’ and Instructors’ Perspectives about Off-Task Technology Use in the Academic Classroom. The Canadian Journal for the Scholarship of Teaching and Learning, 10(1).
- Ehrlick, S. (2014). Managing Digital Distraction: A Pedagogical Approach for Dealing with Wireless Devices in the Classroom. Journal of teaching and Education, 03 (03).
- Lang, James M. (2017, March 13). The Distracted Classroom. The Chronicle of Higher Education.
- establish a visual (e.g., raise hand) or auditory cue (e.g., key word, sound) to cue a transition from students talking and refocusing as a large group back to the instructor. Practice this cue from day one, reinforcing with students its importance in quick transitions and efficient use of time.
Various barriers (circumstances or obstacles that can impede learning) and disabilities (visible and invisible) can prevent students from fully participating in learning:
- explore the ALC space to identify potential barriers to learning and teaching
- conduct an Access Check to identify barriers that may hinder or block learning and then take an active role in ensuring that alternative teaching and learning approaches, as well as possible accommodation solutions, are explored
- be proactive rather than reactive by designing learning using Universal Design principles (embodied in models such as Universal Design for Learning) which allow you to optimize teaching and learning for diverse learners
- co-create a Community Agreement – guidelines for what it means to be respectful, to clarify expectations about turn-taking and engaging in activities, or accessibility needs in the ALC space
- facilitate for equity by paying attention to historic and contemporary experiences of marginalization and how they manifest in the classroom, and actively combat patterns where people from non-dominant groups are less likely to participate equitably because of the ways we have designed our class time, space and dynamics
- be flexible and creative in curriculum delivery: reinforce key points using multiple formats (verbally, graphically, demonstration); use a variety of active learning strategies (e.g., think-pair-share, case studies, role-playing, jigsaw, etc.); and offer diverse forms of assessments and reflections to allow or encourage multiple ways of demonstrating learning
Getting help and feedback
As you prepare to teach in an ALC, take advantage of available support:
- Talk to colleagues within your department or division who have experience teaching in ALCs. They may be able to suggest a specific activity or classroom management strategy that’s worked well in their classes.
- Request a consultation with the Centre for Teaching Support and Innovation for support with teaching in an Active Learning Classroom and with developing an active learning strategy for your courses.
Resources to Support Active Learning at U of T
Please note: resources linked to outside institutions might use definitions for active learning and active learning classrooms that differ from U of T’s but offer useful advice and perspectives on specific pieces.
Teaching in Myhal 150 with Sarah Mayes-Tang, Department of Mathematics, FAS:
Active Learning and Engagement Activities: the questions and concerns to consider while planning an active learning course (from the University of Texas at Austin)
Active Learning in Higher Education: an online publication produced by Sage Journals
Teaching in Myhal 150 with Sarah Mayes-Tang, Department of Mathematics, FAS:
Adventures in Technology-Enhanced Active Learning Classrooms: a conference poster on the use of active learning practices in various UTM classrooms.
External Resources:
- Active Learning Techniques (University of Windsor)
- Active Learning Activities (University of Waterloo)
- Active Learning Techniques (University of Manitoba)
- Activity-Based Learning (Harvard University’s ablconnect)
- Shifting the Focus of Activity from Teachers to Learners (North Carolina State University)
Teaching in Myhal 150 with Sarah Mayes-Tang, Department of Mathematics, FAS:
Baepler, P., Walker, J. D., Brooks, D. C., Saichaie, K., & Petersen, C. (2016). Common teaching challenges in active learning classrooms. A guide to teaching in the active learning classroom: History, research, and practice (pp. 52-70). Sterling, VA: Stylus. [Permanent link to U of T Library listing]