Quercus Gradebook
The Gradebook helps instructors enter, view, filter, and distribute grades for students.
Depending on the Grade display type, grades for each assignment can be viewed as points, percentage, complete or incomplete, GPA scale, or letter grade. A number of potential issues regarding the use of letter grades in Quercus have been identified. Problems can occur when using Gradebook or the online assignment grading tool, SpeedGrader. Please refer to the note on Letter Grades.
Only graded assignments, graded discussions, graded quizzes, and graded surveys that have been published display in the Gradebook. Ungraded assignments are not included.
Final grades are not to be published in Quercus.
Official final grades are only distributed to students from the University Registrar’s Office via ROSI/ACORN.
Note about Letter Grades
A number of potential issues regarding the use of letter grades in Quercus have been identified. Problems can occur when using Gradebook or the online assignment grading tool SpeedGrader. Please consult our Letter Grades in Quercus section for more information.
The Academic Toolbox helps you...
Typical Course Format?
Most tools in the Academic Toolbox can assist in both online and face-to-face courses. Many tools can provide benefits in either synchronous or asynchronous teaching. Some tools have been primarily designed for one format or another (synchronous/asynchronous), however, may be adapted for any format depending on your pedagogical goals.
To learn more about different teaching modalities, please consult our Online Teaching & Learning page, arrange a consultation with a CTSI Teaching Liason, or contact your Divisional support representative.
Where can I get more support?
Related resources / similar tools
How to Get Started
The Gradebook is the “Grades” menu area of your Quercus course. The gradebook helps instructors easily enter, view, and distribute grades for students. There are multiple ways to view grades for a class or individual student, gradebook history and to filter by assignments.
How to Use This Tool
Instructors can choose from three options when grading with Quercus:
- The Gradebook is a spreadsheet where you can input and distribute grades for course work. Grades can be calculated as points, percentages, or other marking scheme permitted by your division.
- Speedgrader enables sequentially viewing student work and entering grades, as well as annotating with comments on documents. You can access Speedgrader from the Gradebook or within any assignment, quiz, or graded discussion.
- To grade offline, export grades from the Gradebook in a spreadsheet that can be edited. Once complete, upload the spreadsheet to Quercus to post your grades.
Manually Post Grades is the default setting for courses in Quercus. This allows an instructor to decide when to release grades.
Instructions
-
Enter Grades
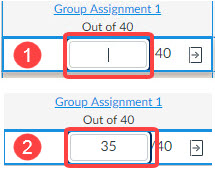
For graded assignments, you can manually enter and edit grades directly in the selected cell.

- Click into a cell to highlight the cell with a crosshair.
- Enter a grade or edit an existing grade.
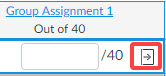
You can also use SpeedGrader to view, comment, and grade student submissions directly within the browser. In the new Gradebook, SpeedGrader is accessible from the Grade Detail Tray.
Note about Quercus (Canvas) System Performance:
In large courses, SpeedGrader loading times are affected by a threshold of data points that can be loaded within a 60-second window. This threshold is based on a single submission per student. Multiple submissions by the same student increases the submission threshold. Assignments with more than 1,500 submissions may result in delayed SpeedGrader loading times, and assignments with more than 2,500 submissions may fail to load at all.
-
Important Information about Letter Grades in Quercus
A number of potential issues regarding the use of letter grades in Quercus have been identified. Please refer to the information in the Quercus Letter Grades page if you are considering using letter grades in your Quercus Gradebook.
-
Grade Detail Tray
The Grade Detail Tray allows instructors to view and enter grades, submission status, and comments, both by individual assignment or student. Instructors can also access Speedgrader for an Assignment or view the individual Grades page for a student.To view the Grade Detail Tray, click on any cell in the Gradebook and click the Grade Detail Tray icon that appears. The Grade Detail Tray will open on the right side of the screen.
Features
The Grade Detail Tray offers the following features:
- Student Name: Select to view the individual student’s Grade page
- Move Between Students: Click the arrows to advance to the next student’s details on the same assignment.
- Move Between Assignments: Click the arrows on either side of the Assignment Name to advance to the next assignment for the same student.
- SpeedGrader : Click on the link to go to the Speedgrader for the selected assignment.
- Grade Input Box: Use this box to enter, view, or change the student’s grade for that submission.
- Status: Quercus automatically assigns a status based on the assignment due date and the student submission date. Use the Status box in the Grade Detail Tray to manually enter, view, or change student submission status. Available statuses include Late, Missing, Excused, or None. If you select the Late status you will also be able to specify the total number of days late.Note: You can customize the colours for all statuses except None by selecting Statuses in the View menu.
- Comments: Use this box to enter, view, edit, or delete comments for the submission. Click Submit to attach the comments to the submission.Note: Students will be able to view these comments only if the assignment grade is posted. If the assignment grade is hidden, they will not be able to see any instructor comments.
- Student Name: Select to view the individual student’s Grade page
-
Grade Posting Policy Setting
The Grade Posting Policy feature in the Gradebook allows instructors to define if grades and comments are posted automatically or manually. This can be done at the course or assignment level:
- Automatically Post Grades: When this setting is selected for the course or an individual assignment, grades and comments are visible to students as soon as they are entered.
- Manually Post Grades: When this setting is selected for the course or an individual assignment, grades and comments are hidden from students until posted.
NOTE: Manually Post Grades is the default setting for every course in Quercus.
Resource: How do I use posting policies in a course?
Change Grade Posting Policy to “Automatically” for the Course
- In Course Navigation, select Grades.
- Select the Settings (gear) icon.
- Select the Grade Posting Policy tab.
- Select the Automatically Post Grades option.
- Click the Apply Settings button to save your change
Resource: How do I select a grade posting policy for a course in the Gradebook?
Change the Grade Post Policy to “Automatically” for an Assignment
- In Course Navigation, select Grades.
- Hover over the assignment column header and click the Options icon (3 vertical dots).
- Select the Grade Posting Policy option at the bottom of the drop down menu.
- Select Automatically from the menu that appears on the right side of the screen.
- Click the Save button to apply your changes.
Resource: How do I select a grade posting policy for an assignment in the Gradebook?
-
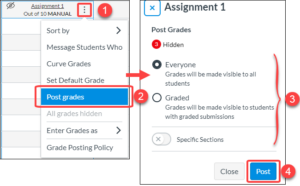
Post Grades and Comments for an Assignment
The default for courses is Manually Post Grades, you will need to post grades before they will be visible to students, unless you have changed it to Automatically Post Grades.
You can post grades and comments immediately when you are ready to release them to students, or schedule them to post at a future date and time. Grades and comments can be scheduled to post together or separately, depending on your needs.
Post grades and comments for an assignment:
- Go to Gradebook.
- Hover over the assignment column header and click the Options icon (3 vertical dots).
- Select Post grades.
- Select a Posting Option. You can Post Grades to:
- Everyone (all students) or Graded (only students with graded submissions).
- You will also have the option to release the grades to Specific Sections in your course.
- Click Post to confirm.
Note: You will not be able to access the Post grades feature for an assignment unless you’ve entered a grade or comment for at least one of your students.
Resource: How do I post grades for an assignment in the Gradebook?
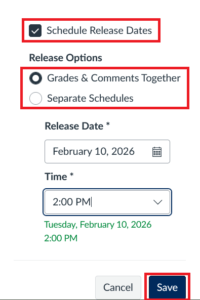
Schedule posting grades and comments for an assignment:
- Go to Gradebook.
- Hover over the assignment column header and click the Options icon (3 vertical dots).
- Select Grade Posting Policy.
- Make sure the Manually option is selected, then select the Schedule Release Dates checkbox.
- Choose whether to release Grades and Comments Together or on Separate Schedules.
- Set the Release Date and Time.
- Select Save.
Resource: Scheduled Feedback Release
Notes:
- You can still manually post grades and comments early if needed. Manual release overrides the scheduled release.
- When using separate schedules to post grades and comments, comments must be released before grades.
- Scheduled release dates are not preserved during course copy/import.
-
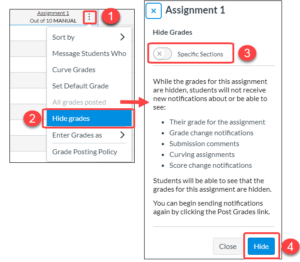
Hide Grades for an Assignment
The Hide Grades feature is useful for hiding grades that have already been posted for an individual assignment. To avoid automatically showing grades to students as soon as they’re entered, it is recommended to leave the Grade Post Policy as Manually Post Grades rather than using the Hide Grades feature.
To hide grades for an individual assignment:
- Hover over the assignment column header and click the Options icon (3 vertical dots).
- Click Hide grades
- Select the option to hide the grades only for Specific Sections, if applicable.
- Click Hide to confirm.
Note: You will not be able to access the Hide grades feature for an assignment unless there is a posted grade or comment for at least one of your students.
Resource: How do I hide grades that were previously posted in the Gradebook?
-
Grade Post Policy Indicators
The following table shows the Grade Post Policy indicators you may see in the Gradebook and what they mean:
Indicator
Name
What it means
No indicator
The Grade Post Policy for the course or for the assignment is set to Automatic. - grades are visible to students as soon as they are entered.
- to prevent students from seeing their grades, change the Grade Posting Policy for the assignment or course to Manual
The word Manual The Grade Post Policy for the course or for the assignment is set to Manual. - when grades are added for the assignment, an outlined Visibility icon (i.e. an eye icon with a grey outline and a diagonal line through it) will also display and the grades will be hidden from student view until posted.
- after grades are posted, the grey Visibility icon disappears and only the word Manual remains in the column heading, unless the grade post policy for an assignment or course is changed to Automatic.
An outlined Visibility Icon and the word Manual The Grade Post Policy for the course or for the assignment is set to Manual AND there is a at least one unposted grade or comment. - when all graded submissions have been posted for an assignment, the icon will disappear and only the word Manual will remain in the column heading, unless the grade post policy for an assignment or course is changed to Automatic.
Resource: How do I use posting policies in a course?
For a quick guide on managing student grade visibility in your course, please see the following Canvas document: Student Grade Visibility Flowchart (pdf).
-
Organization and Management
The Gradebook offers various features to customize your Gradebook view according to your preference. You can organize and manage the Gradebook content by using features such as Arrange By, Sort By, and Filters.
1. Arrange Columns
Instructors can organize the order of assignment columns in the Gradebook via Arrange By feature or manually:
-
-
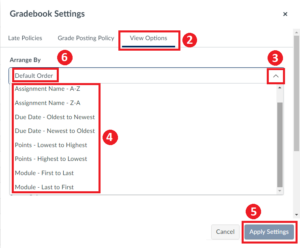
Arrange By
This feature affects all the columns in the Gradebook.
- From Grades, click on the Settings icon.
- Select View Options tab.
- Open the Arrange By drop-down menu to see all the options for ordering columns in the Gradebook.
- Select the desired option: Assignment Name, Due date, Points, or Module.
- Click the Apply Settings button. The Gradebook will be organized by your chosen option from left to right.
- Select Default Order and click Apply Settings again to return to the original order of assignments. The default order is the order set in the Assignments page.
- From Grades, click on the Settings icon.
-
-
Manually
You can also arrange Gradebook columns by clicking the column heading and dragging the heading to the desired location.
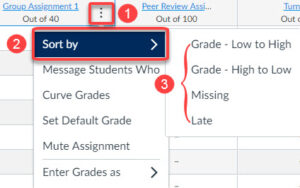
2. Sort Individual Assignment Columns
Instructors can sort individual assignment columns by Grade or Assignment Status in the Gradebook.
- For the desired Assignment column, select the More Options menu (3 vertical dots).
- Select the Sort by link.
- Select one of the sorting options.
3. View Specific Content in Gradebook
Gradebook Filters allow you to filter for specific content in Gradebook.
Instructors can create and apply gradebook filters to minimize what is shown in the Gradebook, select and manage filter types used in a filter, and enable or disable a filter. A filter may be used once or saved for future use.
-
-
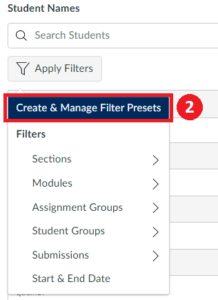
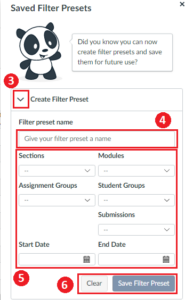
Create a Filter Preset
- From Grades, click the Apply Filters button.
- Click the Create & Manage Filter Presets menu item.
- To create a new filter, click the Create Filter Preset expand arrow icon.
- Enter a filter name in the Filter preset name field.
- Select to filter by Sections, Modules, Assignment Groups, Student Group, Submissions, and/or Start Date and End Dates of assignments.
- Click the Save Filter Preset button. To clear the filter presets, click the Clear button.
- The saved Filter Preset will be listed under Saved Filter Presets.
- From Grades, click the Apply Filters button.
-
-
-
Enable or Disable a filter
- From Grades, click on the Apply Filters
- To enable a saved filter click the name of the filter under Saved Filter Presets, You will see a checkmark icon next to the applied Gradebook Filter.
- To disable the filter, click the name of the filter again. The checkmark next to the disabled filter will be removed.
-
-
Manage filters
Instructors can view, edit or delete gradebook filters created using the Gradebook Filters feature.
- From Grades, click on the Apply Filters
- Click the Create & Manage Filter Presets menu item.
- In the Saved Filters Presets sidebar, existing filters display. Click the expand arrow icon to the left of the filter name to view the filter fields.
- Change filter types as needed.
- Click Save Filter Preset.
- To delete the filter, click the DeletePreset
-
-
View Student Information
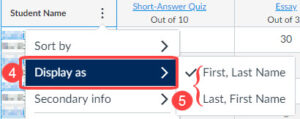
The Student Name column in the New Gradebook offers options for sorting and displaying student names and secondary information.
1. Sort and Display Student Names
You can view options to sort names in alphabetical order by student’s last name. You can also display student names by either first or last name. Sorting, however, is always done by the student’s last name.
-
- Hover cursor over the Student Name column header and select the More Options menu (3 vertical dots).
- Select the Sort by link to view sorting options.
- By default, student names display in ascending alphabetical order (A-Z), according to student’s last name. To sort in descending order, click the Z-A option.
- To display names in a specific name order, select the Display as link.
- By default, student names display as First, Last Name. To display by last name first, select the Last, First Name option.
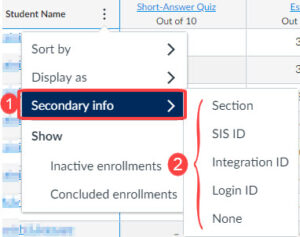
2. View Secondary Information
Additionally, the Secondary Info menu allows secondary information to display below the student’s name. Only one secondary information option can be displayed at a time.
-
- To add secondary information to the Student Name column, select the Secondary info link.
- Select the desired option: Section, SIS ID, Integration ID, Login ID, or None.Note: At the University of Toronto, selecting SIS ID or Login ID will display the student’s UTORid. Selecting Integration ID will display the student’s Student Number.
3. Search Students
The default view of the Gradebook lists all active students in your course. You can use the Search field to search for an individual student by name, Student Number or UTORid.
-
-
Late and Missing Submission Policies
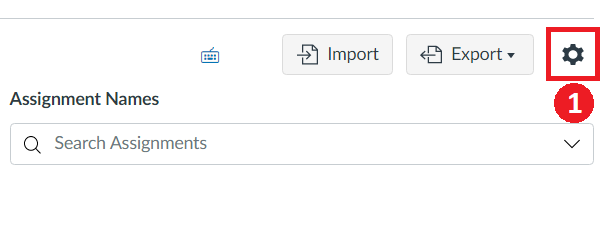
In the Gradebook, the Settings menu (the gear icon) is where instructors can set grading rules for late and missing submissions.
NOTE: Late Policies is the name of the tool in Quercus (Canvas) that instructors can use to calculate grades for late or missing submissions, as specified in the course syllabus. This tool is not associated with U of T Grading Policies. Please check with your department or division for Grading practices before implementing grade rules.
1. Access the Settings Menu
To access the Settings menu, click the gear icon at the top right of the Gradebook:
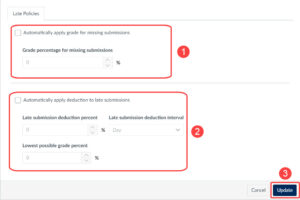
2. Enable Late and Missing Submission Rules
After clicking on the Settings menu icon, a Late Policies tab will appear:
- To enable a Missing Submission rule click the check box, and enter a percentage to be assigned when a submission is missing after the due date. For additional information, see: How do I apply a Missing Submission policy in the Gradebook?
- To enable a Late Submission rule, click the check box , select a percentage to be deducted, and select for it to be deducted for each Day or Hour that it is late. You can also define a threshold percentage (Lowest possible grade percent) under which a student will not be scored, regardless of how late the submission is submitted. For additional information, see: How do I apply a Late Submission policy in the Gradebook?
- Click Update to finalize the settings selected in [1] and/or [2].
3. Important Considerations for Late and Missing Submission Rules
If you choose to enable policies for Late and/or Missing submissions in your Quercus course, please be aware that these rules:
- Must be set up on a course-by-course basis. They do not apply at a global instructor level.
- Cannot be set for individual assignments. They will apply automatically to all online submission assignments, including quizzes and discussions. This includes assignments with due dates in the past. To exclude a specific assignment, submissions need to be manually changed to a status other than Late or Missing in the Grade Detail Tray.
- Do not apply to Paper Submission or No Submission assignments or assignments setup with external tools (including publisher integrations). Those assignment types can be manually designated as Missing or Late in the Grade Detail Tray. Their grades can also be calculated manually and adjusted accordingly.
In addition, please consider the following best practices:
- Determine any rules you wish to apply to Late and/or Missing submissions and set them up in your Quercus course before creating assignments
- Include information about Late and/or Missing submissions in your course syllabus or outline. Consider linking to this information in every assignment description so that students are aware of any points that will be deducted for Late and/or Missing Submissions.
-
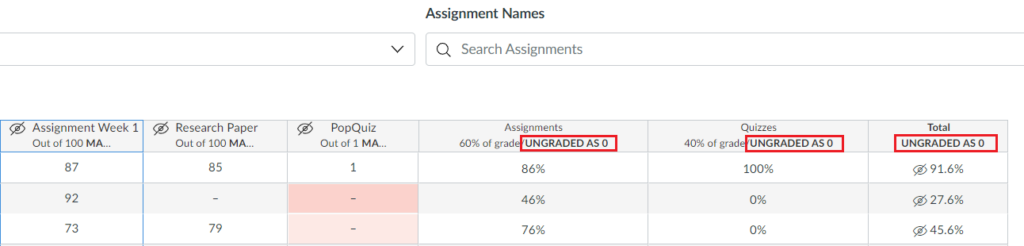
View Ungraded as Zero
By default, ungraded assignments are not included in any assignment total calculations.
View Ungraded as 0 option provides instructors with a visual change in identifying grading calculations for ungraded assignments. This feature allows instructors to view student grades as if all ungraded assignments were worth zero points.
To apply actual grades to ungraded Assignments, not just make a visual adjustment, see the Apply Score to Ungraded section below.
When the View Ungraded as 0 setting is enabled, UNGRADED AS 0 displays as a heading in all Assignment Group columns and the Total column to indicate this feature is turned on in the Gradebook.
Quercus will not populate zeros in the Gradebook for student submissions within individual assignments. Only the Assignment Groups and Total columns will automatically factor in all scores of zero into the overall percentages for each student.
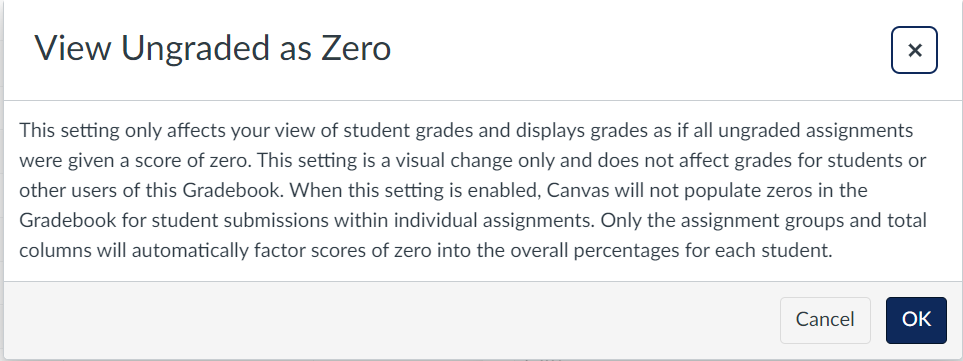
This setting is a visual change only and does not affect grades for students or other users of the Gradebook; students cannot see any difference in their grade pages. Similarly, TAs or other instructors in the course will not see any change in their view of the Gradebook. Only the user who enables this option in the Gradebook will see the affected grades.
Note: This feature affects the configuration of the Total Column in the Gradebook, which also applies to CSV Exports. The CSV file displays columns for the Current and Final scores: the Current score reflects the total while ignoring unsubmitted assignments (option disabled), and the Final score counts unsubmitted assignments as zero (option enabled).
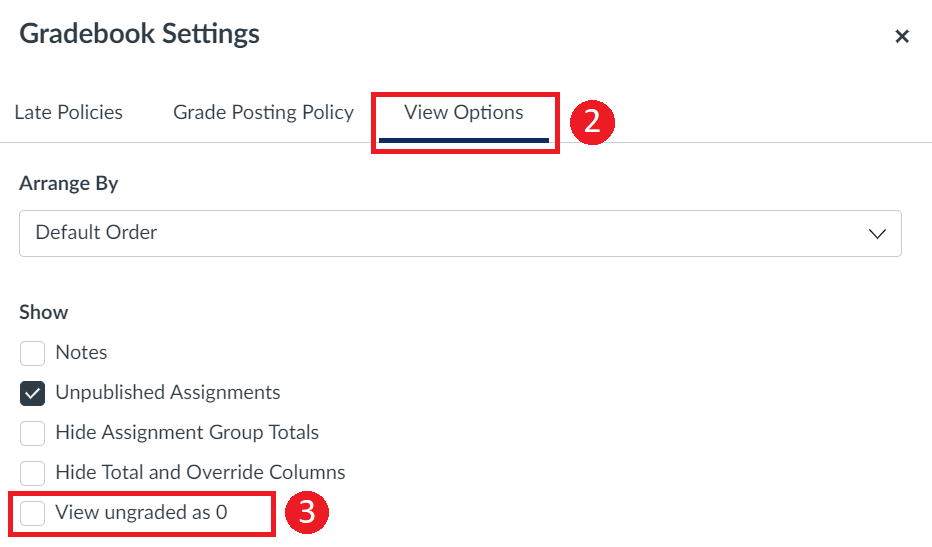
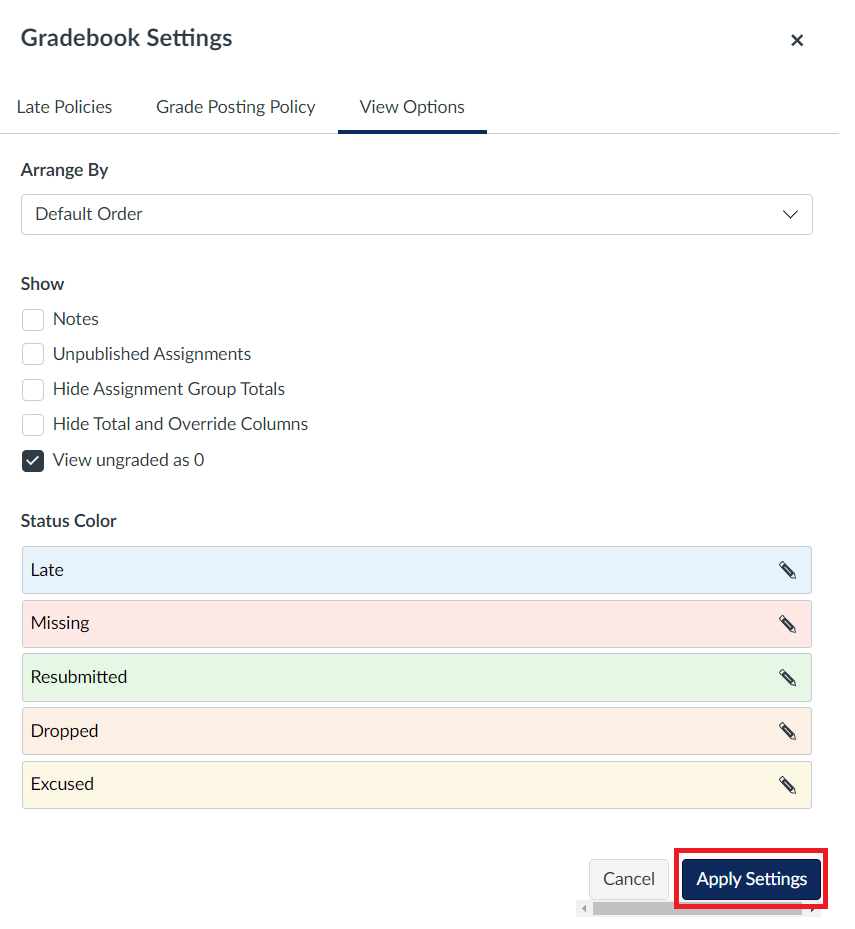
- From Grades, click on the Settings icon.
- Select View Options tab.
- Select the View ungraded as 0 checkbox.
- A window will pop up to provide some information about using this feature.
- Click OK to proceed.
- Select Apply Settings.
Apply Score to Ungraded
The Apply Score to Ungraded setting allows you to apply a score to ungraded Assignments in a course. A full guide can be found on the Canvas support site.
Scores can be applied for the full course by using the “Total” column in the Gradebook, or only to a specific Assignment Group by using the column for that Group.
When applying scores, it can be done for all ungraded Assignments, or only those that are past their due date.
Tip: Have an Assignment Group with weekly Quizzes and a drop-lowest scores rule that allows students to miss a certain number of Quizzes? As this rule requires grades to be added so scores are dropped, use the View Ungraded as 0 setting to see how everything will calculate when Quizzes that were not submitted are graded with zeroes. When you are ready to grade the Quizzes students skipped, use the Apply Score to Ungraded feature for that Assignment Group to add a grade of zero to all ungraded Quizzes that are past their due date.
- From Grades, click on the Settings icon.
-
Canvas, the platform powering Quercus, has several built-in tools and settings that are under development and being tested by Instructure (Canvas). These typically involve significant changes to the regular workflow within Quercus and are not enabled by default. Please note that some Canvas Feature Options may not be available at the University of Toronto.
Anonymous grading allows for the option to anonymously grade Quercus Assignments. Learn more at Anonymous Grading.
You can also Hide Student Names in SpeedGrader.
-
Instructors can use this feature to hide the view of quantitative (numeric) data for students and observers. When this setting is enabled, students cannot see the points and percentages associated with an assigned grade, but they would be able to view feedback and the equivalent letter grades defined by the grading scheme. Teachers, TAs and Graders can still view the numeric data.
Notes:
- Point and percentage grades are converted to Letter Grades, regardless of the Display Grade type selected by the instructor.
- The default grading scheme in Quercus does not align with the University of Toronto’s grading schemes. Please make sure to select the appropriate U of T grading scheme for the course or the assignment. Please refer to the information in the Quercus Letter Grades page for more information and considerations.
- All grades are displayed as Letter Grades or Complete/Incomplete in the Grades tab for student.
- Quizzes still show numeric point values to students if they navigate directly to the Quiz page.
- Click Settings on the Course Navigation Menu.
- Select Course Details tab (usually selected by default).
- Scroll down to Quantitative Data Options.
- Select the Restrict view of quantitative data checkbox.
- Select Update Course Details to save your changes.
-
Note about Quercus (Canvas) System Performance:
The New Gradebook should render consistently in courses with a course weight of up to 80,000.
A course weight is calculated as follows: (# of Students) X (# of Assignments).Please consult our resource page on Considerations for Large Courses for details about Quercus and large course use.
 The Grade Detail Tray allows instructors to view and enter grades, submission status, and comments, both by individual assignment or student. Instructors can also access
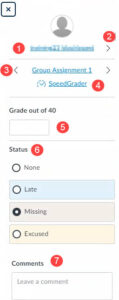


Guides
-
- What are Grades and Gradebook from the Canvas community.
- How to use the Gradebook from the Canvas community.
- The Canvas Instructor guide Index – search for Grades or Gradebook.
Videos
Additional Information From Local Academic Units
Faculty of Applied Science and Engineering
FASE Education Technology Office (ETO):
- Quercus Gradebook
- Faculty question of the week –
“Why don’t the grade totals in Quercus match my own calculations?“ - 2026 Quercus updates –
Gradebook: New visibility and scheduling features
Considerations
Privacy Considerations:
- For more information about setting a Grade Posting Policy, please see the following guide: How do I use posting policies in my course?
Accessibility Considerations:
- The Gradebook includes the following keyboard shortcuts:
- s : Sort the grid on the current active column; applied sorting is by grade (low to high)
- m : Open menu for the active column
- esc : Close the currently active menu
- g : Go to the current assignment’s detail page
- c : Open the grade detail tray
- When navigating the Gradebook grid, press the escape key before using keyboard shortcuts.
Last Modified:
4 March, 2026
This work is licensed under a Creative Commons BY-NC-SA 4.0 International License