Quercus Groups
Groups can be used used to form smaller groups within a class to facilitate collaboration on group assignments, wiki pages, discussions and any activity that would benefit from having a smaller group of participants.
Groups can also be used for professional development and institutional committees or activities for faculty and staff.
UT Advanced Group Tool
The UT Advanced Group Tool is only accessible to users enrolled in a course as a Teacher, TA, Course Staff, Grader, Designer, or Librarian. The link to the tool needs to be enabled in the Course Navigation Menu.
Auto-Creating Groups
When using the auto-create Groups options, the “Require group members to be in the same section” setting should only be used if students are enrolled in a single section at a time. If students are enrolled in multiple sections at once, using this option may cause issues.
The Academic Toolbox helps you...
Typical Course Format?
Most tools in the Academic Toolbox can assist in both online and face-to-face courses. Many tools can provide benefits in either synchronous or asynchronous teaching. Some tools have been primarily designed for one format or another (synchronous/asynchronous), however, may be adapted for any format depending on your pedagogical goals.
To learn more about different teaching modalities, please consult our Online Teaching & Learning page, arrange a consultation with a CTSI Teaching Liason, or contact your Divisional support representative.
Where can I get more support?
How to Get Started
Organizing the students in your Quercus course into a Group Set allows you to administer group work and facilitate communication to and between the group members.
How to Use This Tool
Organizing the students in your Quercus course into a Group Set allows you to administer group work and facilitate communication to and between the group members. There are two options to create student groups: Canvas Groups and UT Advanced Group tool.
A Group Set houses the different Groups within a course for a given purpose, such as a collaborative project. Every Group has access to their own set of tools such as Discussions, Announcements, and Files. Each course can have multiple Group Sets.
The UT Advanced Group Tool (UTAGT) allows course staff to perform a variety of advanced tasks such as create Groups using baseline rosters, create Sections from Groups, and batch enroll students into Groups.
Instructions
-
Add Groups
Add Group Set
In order to create groups in your course, you first need to create a Group Set
 . You could then attach the Group Set to a group assignment or a group discussion to assign it to the groups within the Group Set.
When creating a Group Set, you could choose to automatically create groups
within the Group Set and randomly assign students to groups, or create groups manually .Add Groups Manually
After creating the Group Set, you can manually create groups under the Group Set.
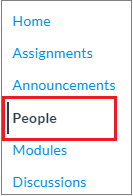
- Click People on the course menu
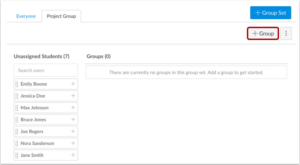
- Click the Group Set tab
- Click on +Group button
- Name the group by typing in the Group Name
- If you want to limit groups to a specific size, enter the maximum number of group members in the Limit groups to field
- Click the Save button
You can repeat these steps to create all the groups you need.
- Click People on the course menu
-
Assign Students to Groups
After creating the groups, you can randomly assign students to the groups
, or choose to add students to the groups manually . -
Create Self Sign-up Groups
Self sign-up groups
are used to allow students to choose the group they want to be in as part of a Group Set. You can also limit the number of members who can sign up for each group.Students can join self sign-up groups
through the People page.Note: instructors must enable the People tool prior to creating groups.
-
Group Assignments
Once groups are created in your course, you can create group assignments
to allow students to collaboratively work in teams. With group assignments, only one student in the group has to submit the assignment. -
Grade Group Assignments
-
Online Submissions
For online submitted files through Quercus, you can grade group assignments via SpeedGrader
. When grading the assignment in SpeedGrader, it will show the Group names instead of the student names. Once you give the group a grade, everyone in that group will see the grade and the comments. - Grades are typically assigned to the entire group, but you can choose to assign grades to students individually.
-
Adjust Grade for Individual Group Members
After assigning grades to the entire group, you can change the grade for individuals in the group by editing the assignment’s settings:
- click on the assignment
- Click the Edit button
- Check the box for Assign Grades to Each Student Individually
- Click Save
- Click on Grades on the course menu.
- Adjust the scores for individuals in the group
-
Offline Submissions
To grade No Submission or On Paper group assignments, click the Grades on the course menu and enter a score for one member in the group. It will be copied to the other group members.
-
-
Group Discussions
If you have a big class, it might be helpful to break your discussions into groups to have more intimate or group-specific discussions. To create a group discussion
, you set up the discussion topic once, but it appears in multiple separate groups. Only the members of the group will see and respond to their group’s post. -
UT Advanced Group Tool
The UT Advanced Group Tool (UTAGT) allows course staff to perform a variety of advanced tasks such as create Groups using baseline rosters, create Sections from Groups, and batch enroll students into Groups.
In This Section
- Access the Tool
- Create Baseline Group Sets
- Update Baseline Group Sets
- Remove All Group Members
- Clone Groups into Sections
- Update or Delete Sections Created From Groups
- Import Group Rosters
- Export Group Rosters
Access the Tool
The UT Advanced Group Tool is only accessible to users enrolled in a course as a Teacher, TA, Course Staff, Grader, Designer, or Librarian. The link to the tool needs to be enabled in the Course Navigation Menu.
- In your Course Navigation Menu, click Settings.
- From the tabs at the top, click Navigation.
- Click and drag UT Advanced Group Tool up from the bottom list of hidden navigation items to the top list of visible items. Place it where you would like it to appear in the course menu.
- Click Save at the bottom.
Create Baseline Group Sets
Baselines Group Sets are Group Sets that reflect the student enrollments of another course or section, called the baseline roster.
NOTE: Once created, group memberships in Baseline Group Sets must be manually updated by following Update Baseline Group Sets
.- Click UT Advanced Group Tool from the Course Navigation Menu.
- Click Create Baseline Group Set.
- Select the Courses or Sections to be used as the baseline roster. There are a few options to choose from:
- Current Course – select the students in the primary section or across all sections in the current course
- Cross-listed Sections – select sections that have been cross-listed into the current course
- Other Courses – select from other courses you are enrolled in as a course staff
NOTE: Students in the selected courses or sections will only be added to the Group Set if they are enrolled in the current course.
- Specify a name for the Group Set.
- Specify how many Groups you would like to randomly distribute the students across. If you would like to manually assign students to the Groups, enter “1” here. After the Groups have been created, you can create groups manually and individually assign students.
- Provide a name for the Groups.
- Click Submit.
Update Baseline Group Sets
Group memberships in Baseline Group Sets are not automatically updated when new students enroll into the course or students switch between sections on ACORN. You can manually update the group memberships to account for these course enrollment changes. Students who drop the course on ACORN will be automatically removed from both the course and their Groups on Quercus.
- Click UT Advanced Group Tool from the Course Navigation Menu.
- Click Update Baseline Group Sets.
- Find the desired Group Set and click View Enrollment Changes.
- The students to be added or removed from the Group Set will be listed. If needed, you can edit the list of students to be updated.
- Click Update Group Set Membership.
Remove All Group Members
This function is used to batch remove students from one or more Groups.
- Click UT Advanced Group Tool from the Course Navigation Menu.
- Click Remove All Group Members.
- From the dropdown menu, select the desired Group Set.
- Select one or more Groups to delete members from.
- Click Remove.
Clone Groups into Sections
To filter the Gradebook based on Group membership, you can create Sections that mirror the Group enrollments.
NOTE: Enrollments in cloned sections must be manually updated by following Update or Delete Sections Created from Groups
.- Click UT Advanced Group Tool from the Course Navigation Menu.
- Click Clone Groups into Sections.
- Select one or more Group Sets.
- Select the Group(s) that you would like to create Section(s) for.
- Click Clone.
Update or Delete Sections Created From Groups
Enrollments in cloned sections
are not automatically updated when the group membership changes. You must manually update the section enrollments to account for these group membership changes.- Click UT Advanced Group Tool from the Course Navigation Menu.
- Click Clone Groups into Sections.
- Select one or more Group Sets.
- Find the desired Group/Section and click Synchronize or Remove Section.
Import Group Rosters
Course staff of larger courses can batch enroll students into groups by using a CSV or Excel file upload.
NOTE: You can only add students that are enrolled in the current course and are not already members of a Group within the desired Group Set.
- Click UT Advanced Group Tool from the Course Navigation Menu.
- Click Import Group Roster.
- From the dropdown menu, select the desired Group Set.
- Select your desired import method.
- Browse your computer for the CSV or Excel file. Ensure your file is set up correctly, based on the import method:
- Single existing Group – single column of student UTORids
- Single new Group – single column of student UTORids
- Multiple existing Groups – first column of student UTORids and second column of Group IDs
- Mutliple new Groups – first column of student UTORids and second column of Group Names
- Click Import.
Export Group Rosters
You can download a CSV file of the memberships of a desired Group Set or of your entire class, that is also compatible with the Gradebook.
For a specific Group Set:
- Click UT Advanced Group Tool from the Course Navigation Menu.
- Click Export Group Roster.
- From the dropdown menu, select the desired Group Set.
- Select one or more Groups.
- Click Export.
For your entire class:
- Click UT Advanced Group Tool from the Course Navigation Menu.
- Click Export Group Roster.
- Click Download the entire course roster.


Last Modified:
5 December, 2025
This work is licensed under a Creative Commons BY-NC-SA 4.0 International License